
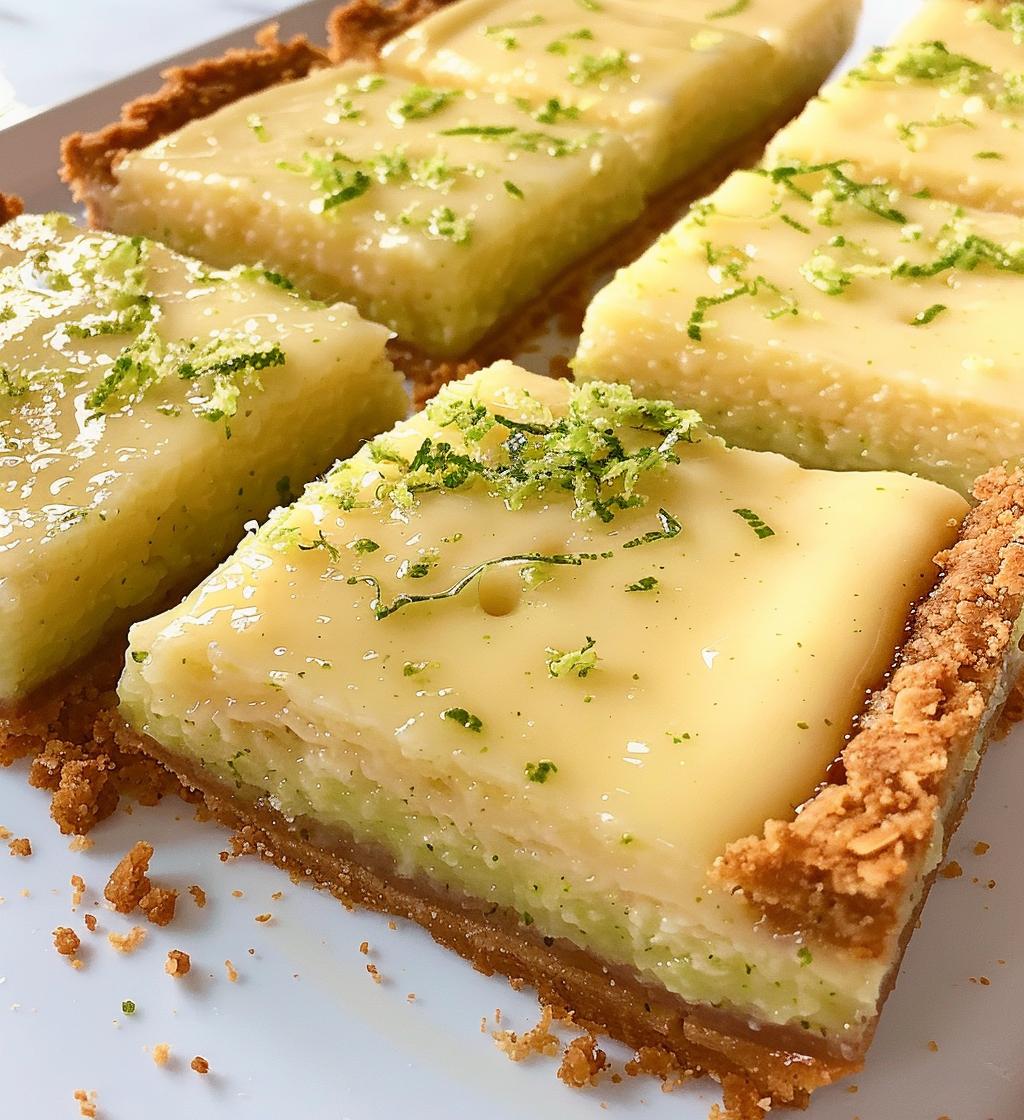
Oh my goodness, let me tell you about my absolute favorite dessert: Key Lime Pie Bars! Whenever I make these, it’s like an instant ticket to summer, no matter the season. The tangy lime filling just dances on your taste buds, and the buttery graham cracker crust? Pure bliss! This recipe has been passed down in my family for years, and it never fails to impress. They’re the kind of treat that everyone fights over at gatherings. Trust me, once you take a bite of these refreshing bars, you’ll understand why they’ve become a staple in my dessert rotation!
Ingredients List
Get ready to gather some simple yet essential ingredients for these delightful Key Lime Pie Bars. Each one plays a crucial role in creating that perfect balance of tangy and sweet!
- 1 1/2 cups graham cracker crumbs – This will form the delicious, buttery crust.
- 1/2 cup unsalted butter, melted – Trust me, the melted butter brings everything together beautifully!
- 1/4 cup granulated sugar – Just a touch of sweetness to enhance the crust.
- 2 large eggs – These help set the filling to perfection.
- 1 can (14 oz) sweetened condensed milk – This is where the creaminess comes from; you’ll love it!
- 1/2 cup fresh lime juice – Fresh is key here for that zesty flavor that brightens up the bars.
- 1 tablespoon lime zest – A little extra zing that elevates the whole dessert!
Make sure you have everything on hand before you start, and you’ll be well on your way to creating these mouthwatering bars!
How to Prepare Key Lime Pie Bars
Alright, let’s dive into the fun part—making these delicious Key Lime Pie Bars! I promise you, it’s easier than you might think, and the results are oh-so-worth it. Just follow along with these steps, and you’ll be savoring these zesty bars in no time!
Preheat and Prepare the Crust
First things first, you’ll want to preheat your oven to 350°F (175°C). This step is crucial because it gets your oven nice and hot, ready for those bars! While it’s heating up, grab a mixing bowl and combine 1 1/2 cups of graham cracker crumbs, 1/2 cup of melted unsalted butter, and 1/4 cup of granulated sugar. Mix it all together until it looks like wet sand. It should smell heavenly already!
Bake the Crust
Now, take that delicious graham cracker mixture and press it firmly into the bottom of a greased 9×9-inch pan. I like to use the back of a measuring cup to ensure it’s evenly packed. Pop it in the preheated oven and bake for about 10 minutes. You want it to just start getting golden and fragrant. When it’s done, take it out and let it cool for a bit while you prepare the filling.
Make the Lime Filling
In another mixing bowl, whisk together 2 large eggs, 1 can of sweetened condensed milk, 1/2 cup of fresh lime juice, and 1 tablespoon of lime zest. I can’t stress enough how important it is to use fresh lime juice here—it really makes a difference! Whisk until everything is well combined and lovely and smooth.
Combine and Bake
Next, pour that beautiful lime mixture over your cooled crust. Spread it evenly with a spatula, and then pop it back into the oven for another 15 minutes. You’ll see it start to set up, and oh, the smell will be amazing! Keep an eye on it, as you want it to be just set but not over-baked.
Cool and Serve
Once it’s out of the oven, let the bars cool at room temperature for a bit. Then, cover and refrigerate them for at least 2 hours. This chilling time is key—it allows the flavors to meld together beautifully, and trust me, they’re best served chilled. When you’re ready to serve, just cut them into bars, and if you like, you can top them with some whipped cream for an extra treat!
Why You’ll Love This Recipe
Let me tell you, there are so many reasons to fall head over heels for these Key Lime Pie Bars! Each bite is a delightful burst of flavor, and here are just a few reasons why you’ll want to whip these up again and again:
- Quick Preparation: You can have these bars ready in no time! With just 15 minutes of prep, you’ll be on your way to a delectable dessert.
- Refreshing Flavor: The tangy lime filling is perfectly balanced, giving you that refreshing taste that’s perfect for any occasion.
- Easy-to-Find Ingredients: You won’t need to hunt for specialty items; just grab some basics from your pantry and local store!
- Delightful Texture: The buttery graham cracker crust pairs beautifully with the creamy lime filling, creating a heavenly combination that’s hard to resist.
- Perfect for Any Gathering: Whether it’s a summer barbecue or a cozy family dinner, these bars are always a hit, and they look so pretty on the dessert table!
- Make Ahead: You can prepare these in advance, and they’ll taste even better after chilling in the fridge for a while. Less stress for you!
Trust me, once you make these Key Lime Pie Bars, they’ll become a favorite in your home too!
Tips for Success
Now that you’re ready to make these scrumptious Key Lime Pie Bars, let me share some of my favorite tips to ensure they turn out perfectly every time! Trust me, these little nuggets of wisdom can make all the difference.
- Measure Accurately: Make sure to measure your ingredients precisely, especially the lime juice and graham cracker crumbs. Too much or too little can throw off the flavor and texture, so use dry measuring cups for the crumbs and a liquid measuring cup for the juice!
- Firm Up That Crust: When pressing the graham cracker mixture into the pan, really pack it down tightly. This will help create a sturdy base that holds up well when you cut the bars. Don’t skip this step—it’s key for preventing a crumbly crust!
- Chill Time is Essential: After baking, resist the temptation to dive in right away! Let the bars cool at room temperature first, and then refrigerate them for at least 2 hours. This chilling time allows the flavors to meld and the filling to set properly.
- Use Fresh Ingredients: Whenever possible, opt for fresh limes instead of bottled juice. The flavor is so much brighter and more vibrant, making your bars taste truly exceptional!
- Watch Your Baking Time: Keep an eye on the bars while they bake. You want them to be just set in the center, so they’ll have a creamy texture. Overbaking can lead to a rubbery filling, and nobody wants that!
- Cut with Care: When it’s time to cut the bars, use a sharp knife and wipe it clean between cuts for neat slices. This helps keep the edges looking pretty and the filling intact!
- Experiment with Toppings: Consider adding a dollop of whipped cream or a sprinkle of lime zest on top before serving. It adds a lovely touch and a burst of extra flavor!
With these tips in your back pocket, you’ll be well on your way to creating the ultimate Key Lime Pie Bars. Happy baking!
Variations
The beauty of these Key Lime Pie Bars is that they’re incredibly versatile! If you’re looking to switch things up or put your unique spin on the recipe, here are some fun variations to try:
- Different Citrus Flavors: Why not mix it up with other citrus fruits? You can substitute some or all of the lime juice with lemon or grapefruit juice for a different tangy twist. Each citrus brings its own personality to the bars!
- Coconut Cream Key Lime Bars: Add a tropical flair by mixing in some shredded coconut into the graham cracker crust or the filling. You can also top the bars with toasted coconut for an extra crunch and flavor boost!
- Gluten-Free Option: If you want a gluten-free version, simply use gluten-free graham crackers or almond flour for the crust. It’s just as delicious and perfect for those with dietary restrictions!
- Berry Swirl: For a pop of color and flavor, try adding a berry swirl! Before baking, drop spoonfuls of raspberry or blueberry puree over the lime filling and gently swirl it with a knife. It looks stunning and adds a delightful fruity taste!
- Chocolate Drizzle: If you’re a chocolate lover, consider drizzling some melted dark chocolate over the cooled bars. The combination of chocolate and lime is surprisingly delightful and makes for a decadent treat!
- Spiced-Up Filling: Add a pinch of cayenne pepper or finely grated ginger to the filling for a little kick. This unexpected spice can elevate the flavor profile and create a more complex taste experience!
Feel free to get creative and experiment with these variations. The possibilities are endless, and I can’t wait to hear what delicious combinations you come up with! Enjoy your baking adventure!
Storage & Reheating Instructions
Once you’ve made these delightful Key Lime Pie Bars, you’ll want to savor every last crumb! Here’s how to store them properly so they stay fresh and delicious:
First, after the bars have cooled completely, cover them tightly with plastic wrap or transfer them to an airtight container. This will keep them from drying out and protect them from any unwanted fridge odors. You can store them in the refrigerator for up to 5 days. Trust me, they taste even better after a day or two as the flavors meld together!
If you find yourself with leftovers (which is rare!), you can also freeze the bars for longer storage. Just cut them into individual portions first, then wrap each piece in plastic wrap and place them in a freezer-safe container or bag. They’ll stay good in the freezer for about 2 months. When you’re ready to enjoy them again, simply take them out and let them thaw in the fridge overnight. No reheating needed—serve them chilled and enjoy that refreshing tang!
So, whether you’re storing them for later or sharing with friends, these tips will help you keep your Key Lime Pie Bars tasting fabulous. Happy storing!
Nutritional Information
When it comes to enjoying these scrumptious Key Lime Pie Bars, it’s always nice to know a bit about what you’re indulging in! Here’s an estimated breakdown of the nutritional information per bar:
- Calories: 180
- Fat: 8g
- Saturated Fat: 5g
- Unsaturated Fat: 3g
- Trans Fat: 0g
- Cholesterol: 30mg
- Sodium: 100mg
- Carbohydrates: 23g
- Fiber: 1g
- Sugar: 12g
- Protein: 2g
Keep in mind that these values are estimates and can vary based on ingredients and portion sizes. But hey, a little indulgence is part of the fun, right? Enjoy every tangy, creamy bite of these fabulous bars!
Frequently Asked Questions
If you’re diving into the world of Key Lime Pie Bars for the first time, you might have a few questions. Don’t worry! I’ve got you covered! Here are some common queries I hear, along with my best answers to help you on your baking journey.
Can I adjust the sweetness of the filling?
Absolutely! If you prefer a less sweet filling, consider reducing the amount of sweetened condensed milk slightly. You can also add more lime juice to enhance the tartness. Just remember to keep the ratio balanced to maintain that creamy texture!
What if I can’t find fresh lime juice?
If fresh lime juice isn’t available, you can use bottled lime juice in a pinch. However, the flavor won’t be quite as vibrant as using fresh limes. I recommend squeezing your own limes whenever possible for the best taste!
How do I serve these bars?
These bars are best served chilled straight from the fridge! You can cut them into squares or rectangles, and if you like, add a dollop of whipped cream or a sprinkle of lime zest on top for that extra flair. They make a lovely presentation at any gathering!
Can I make these bars ahead of time?
Yes, these Key Lime Pie Bars are perfect for making ahead! They actually taste even better after sitting in the fridge for a day or two, as the flavors meld together beautifully. Just be sure to store them properly in an airtight container!
What’s the best way to cut these bars?
To get those clean, beautiful slices, use a sharp knife and wipe it clean between cuts. This keeps the edges looking neat and helps maintain the filling’s integrity. Plus, it makes for a prettier presentation!
Can I freeze Key Lime Pie Bars?
Yes, you can! Just wrap each bar tightly in plastic wrap and place them in a freezer-safe container. They can be frozen for up to 2 months. When you’re ready to enjoy, let them thaw in the fridge overnight and serve them chilled!
Hopefully, these answers help you feel more confident about making your own Key Lime Pie Bars. If you have any other questions, don’t hesitate to reach out. Happy baking!
Print
Key Lime Pie Bars: 7 Reasons You’ll Love This Tangy Treat
- Prep Time: 15 minutes
- Cook Time: 25 minutes
- Total Time: 2 hours 40 minutes
- Yield: 12 bars 1x
- Category: Dessert
- Method: Baking
- Cuisine: American
- Diet: Vegetarian
Description
A refreshing dessert with a tangy lime flavor and a buttery crust.
Ingredients
- 1 1/2 cups graham cracker crumbs
- 1/2 cup unsalted butter, melted
- 1/4 cup granulated sugar
- 2 large eggs
- 1 can (14 oz) sweetened condensed milk
- 1/2 cup fresh lime juice
- 1 tablespoon lime zest
Instructions
- Preheat oven to 350°F (175°C).
- In a bowl, mix graham cracker crumbs, melted butter, and sugar.
- Press the mixture into the bottom of a greased 9×9-inch pan.
- Bake for 10 minutes, then remove from oven.
- In another bowl, whisk together eggs, condensed milk, lime juice, and lime zest.
- Pour the lime mixture over the crust.
- Bake for an additional 15 minutes.
- Let cool, then refrigerate for at least 2 hours before serving.
Notes
- Cut into bars before serving.
- Serve chilled for best flavor.
- You can garnish with whipped cream if desired.
Nutrition
- Serving Size: 1 bar
- Calories: 180
- Sugar: 12g
- Sodium: 100mg
- Fat: 8g
- Saturated Fat: 5g
- Unsaturated Fat: 3g
- Trans Fat: 0g
- Carbohydrates: 23g
- Fiber: 1g
- Protein: 2g
- Cholesterol: 30mg
Keywords: Key Lime Pie Bars