
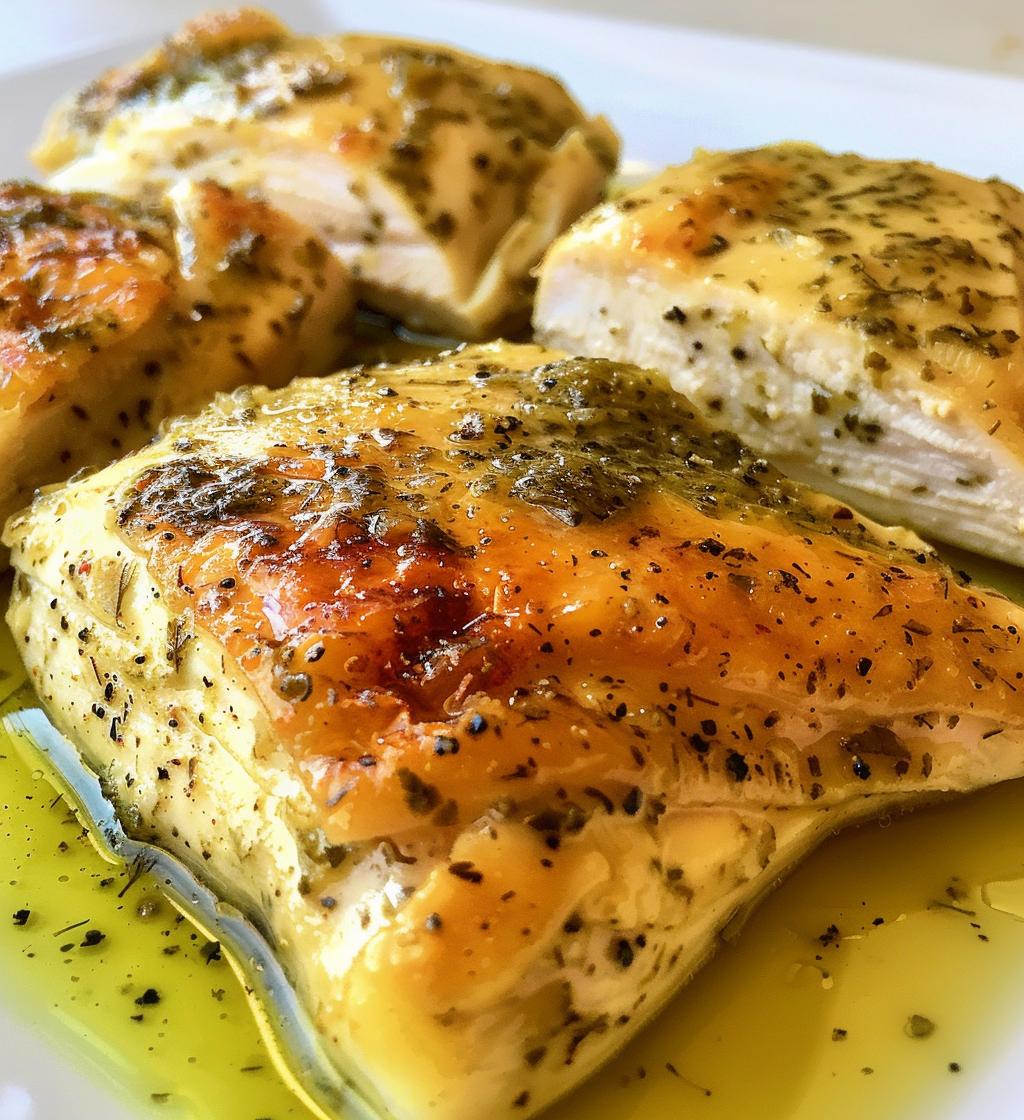
Let me tell you about my absolute favorite quick dinner: Dill Pickle Chicken! Seriously, this dish is a game changer. The tangy, zesty flavor of the dill pickle juice infuses the chicken with a mouthwatering taste that’s just unforgettable. I stumbled upon this recipe during a busy week when I needed something easy but tasty, and it quickly became a family favorite. You won’t believe how simple it is to make! Just a little marinating, some seasoning, and a quick bake, and you’ve got a delicious meal that’s perfect for any night of the week. Plus, it’s gluten-free, so everyone can enjoy it! I love serving it with a side of roasted veggies or fluffy rice to soak up all that pickle goodness. Trust me, once you try it, you’ll be hooked!
Ingredients
(Tip: You’ll find the full list of ingredients and measurements in the recipe card below.)
- 4 chicken breasts
- 1 cup dill pickle juice
- 1 tablespoon olive oil
- 1 teaspoon garlic powder
- 1 teaspoon black pepper
- 1/2 teaspoon salt
These ingredients come together to create a dish that’s simple yet packed with flavor. The dill pickle juice is the star here, transforming plain chicken into something extraordinary! You can also substitute chicken thighs for a juicier option if you prefer. Just think about how all those delightful flavors will meld together while the chicken marinates—yum! Don’t worry if you don’t have garlic powder; fresh minced garlic works just as well! Just remember to adjust the amounts to your taste. Happy cooking!
How to Prepare Dill Pickle Chicken
Now, let’s dive into making this delicious Dill Pickle Chicken! I promise, it’s super simple and totally rewarding. Just follow these steps, and you’ll be on your way to a savory meal that everyone will love!
Step-by-Step Instructions
- First things first, grab your chicken breasts and place them in a large bowl or a zip-top bag. I love using a bag because it makes marinating so easy!
- Next, pour that glorious dill pickle juice all over the chicken. Make sure every piece is submerged—this is where the magic happens! Seal the bag or cover the bowl and pop it in the fridge to marinate. Aim for at least 2 hours, but if you can let it sit overnight, do it! Your chicken will be bursting with flavor.
- When you’re ready to cook, preheat your oven to 375°F (190°C). This is key for getting that perfect bake!
- Once the oven is hot, take the chicken out of the marinade and pat it dry with paper towels. This helps the seasonings stick better. Don’t skip this step!
- Now, rub the chicken with olive oil, then sprinkle on the garlic powder, black pepper, and salt. I like to really massage those spices in to ensure every bite is delicious.
- Place your seasoned chicken in a baking dish, making sure they’re not overcrowded. This allows them to cook evenly.
- Pop the dish in the oven and bake for 25-30 minutes or until the chicken is cooked through and reaches an internal temperature of 165°F (74°C). Oh, the smell of that baking chicken will have your mouth watering!
- Finally, let the chicken rest for about 5 minutes before serving. This helps the juices redistribute, making it even juicier!
And there you have it! A straightforward way to prepare a dish that’s sure to impress. Enjoy every bite of your flavorful Dill Pickle Chicken!
Why You’ll Love This Recipe
- Incredible Flavor: The tangy, savory punch of dill pickle juice elevates the chicken to a whole new level. It’s a flavor combination you didn’t know you needed!
- Super Easy to Make: With just a bit of marinating and a quick bake, you’ll have a delicious meal ready in no time. Perfect for those weeknights when you’re rushing!
- Versatile Dish: Pair it with your favorite sides like roasted veggies, mashed potatoes, or even a fresh salad. It works with just about anything!
- Family-Friendly: Kids and adults alike love the flavor; it’s a guaranteed hit at the dinner table.
- Gluten-Free: This recipe is naturally gluten-free, so it’s a great option for anyone with dietary restrictions.
- Meal Prep Friendly: You can easily double the recipe for meal prep and enjoy it throughout the week!
Trust me, once you’ve tasted this Dill Pickle Chicken, it’ll become a go-to recipe in your kitchen. You’ll find yourself craving it time and again!
Tips for Success
To make sure your Dill Pickle Chicken turns out perfectly every time, here are some tips that I swear by. Trust me, they’ll help you nail this recipe and impress everyone around your dinner table!
- Marinate Longer for Maximum Flavor: If you can, let your chicken marinate overnight. The longer it sits in that dill pickle juice, the more flavorful and tender it will become. But even a couple of hours will do the trick if you’re short on time!
- Pat Dry for Better Seasoning: Don’t skip patting the chicken dry after marinating! This little step helps the olive oil and spices stick better, resulting in a more flavorful crust.
- Use a Meat Thermometer: To ensure your chicken is perfectly cooked, use a meat thermometer. The internal temperature should reach 165°F (74°C). This way, you can avoid any guesswork and ensure juicy chicken every time.
- Experiment with Seasonings: Feel free to play around with the spices! Adding a pinch of paprika or a dash of cayenne pepper can give it a little extra kick, and I love adding fresh herbs like parsley for a pop of color and flavor.
- Let it Rest: After baking, let your chicken rest for those 5 minutes. This step makes a huge difference in keeping the meat juicy and tender. Trust me, you’ll notice the difference!
- Serve with Sides that Soak Up Juice: Pair your Dill Pickle Chicken with sides that can soak up all that delicious flavor, like fluffy rice or creamy mashed potatoes. A fresh salad with a tangy vinaigrette also complements the dish beautifully!
With these tips in your back pocket, you’re well on your way to creating a dish that’s not only flavorful but also a showstopper! Enjoy your cooking adventure!
Nutritional Information Disclaimer
Just a little heads-up! While I strive to provide accurate nutritional information, please remember that these values can vary based on the specific ingredients and brands you use. Factors like cooking methods and portion sizes can also influence the final numbers. So, I can’t guarantee exact nutritional values for this Dill Pickle Chicken. I always recommend checking the labels of the products you’re using for the most precise information. Happy cooking and enjoy every delicious bite!
FAQ Section
Common Questions
Can I use chicken thighs instead of breasts?
Absolutely! Chicken thighs are a fantastic alternative if you’re looking for a juicier option. They’ll soak up that dill pickle juice beautifully and keep even more moisture during cooking. Just adjust the baking time slightly, as thighs may take a bit longer to cook through.
What can I serve with Dill Pickle Chicken?
There are so many delicious options! I love serving it with roasted vegetables or a fresh salad. You could also go for creamy mashed potatoes or fluffy rice to soak up all that amazing pickle flavor. It’s versatile, so feel free to get creative with your sides!
How do I store leftovers?
If you have any leftovers (which is rare because it’s so good!), just let the chicken cool completely, then place it in an airtight container. It’ll keep in the fridge for about 3-4 days. Just remember to reheat it gently to keep it juicy!
Can I freeze Dill Pickle Chicken?
Yes, you can! Just make sure to wrap it well in plastic wrap or place it in a freezer-safe container. It should last for about 2-3 months in the freezer. When you’re ready to enjoy it again, just thaw it in the fridge overnight before reheating.
What if I don’t have dill pickle juice?
No worries at all! If you’re in a pinch, you can make a quick pickle brine with vinegar, water, and some dill or pickling spices. It won’t be exactly the same, but it’ll still give the chicken that tangy flavor you’re after!
Storage & Reheating Instructions
So, if you happen to have any leftovers from your delicious Dill Pickle Chicken (though I can’t promise there will be any!), here’s how to store and reheat them perfectly. First, let the chicken cool completely before you store it. This helps prevent condensation, which can make your chicken soggy. Once it’s cooled, pop it into an airtight container. It’ll keep in the fridge for about 3-4 days. Just make sure to label it so you don’t forget how fabulous it is!
Now, when it comes time to enjoy those leftovers, I recommend reheating gently to keep the chicken juicy and tender. You can either use the microwave or an oven. If you’re using the microwave, just pop it in for about 1-2 minutes, checking every 30 seconds until it’s warmed through. Be careful not to overcook it, or it’ll dry out!
If you have a little more time, reheating in the oven is my favorite method. Preheat your oven to 350°F (175°C), place the chicken in a baking dish, and cover it with foil to prevent it from drying out. Heat for about 10-15 minutes, or until it’s warmed through. You’ll be amazed at how delicious it still tastes! Enjoy every flavorful bite, even the second time around!
Call to Action
I’d love to hear what you think about this Dill Pickle Chicken recipe! If you try it out, please leave a comment below and let me know how it turned out for you. Did your family enjoy it? Did you add your own twist? Sharing your experience not only makes my day but also helps others who are looking to whip up this delicious dish!
Oh, and if you loved it (or even if you just liked it!), consider giving the recipe a rating! Your feedback means the world to me and helps keep this little corner of the internet thriving with tasty ideas. Don’t forget to share this recipe with your friends and family too—after all, good food is meant to be enjoyed together! Happy cooking, and I can’t wait to hear from you!