
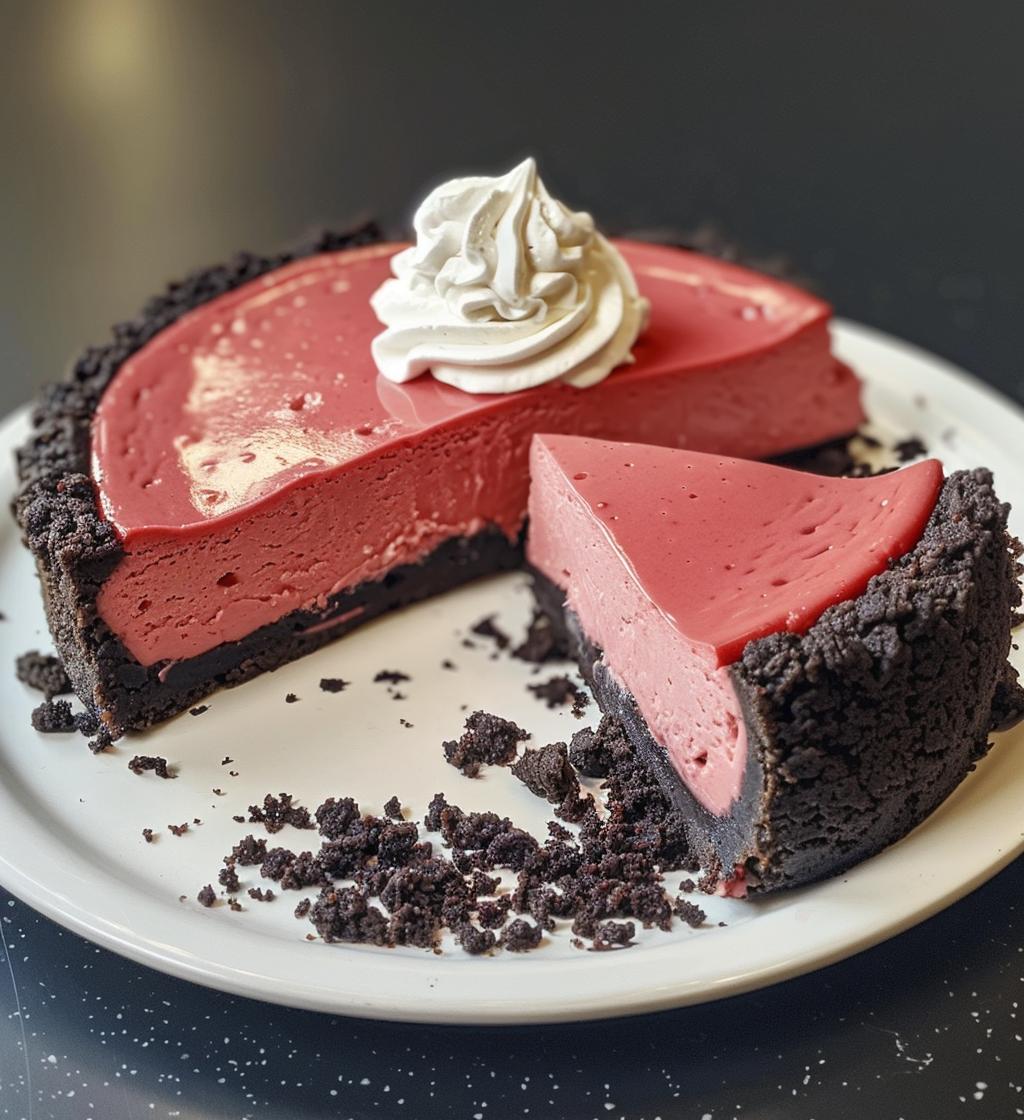
Oh my goodness, let me tell you about my love for Red Velvet Cheesecake! It’s this dreamy, creamy dessert that combines the best of both worlds—rich cheesecake and that iconic red velvet flavor. The vibrant color just pops on the plate, making it a showstopper at any gathering. I remember the first time I tried it at a friend’s birthday party; I was completely hooked! The texture is so velvety smooth, and the chocolate cookie crust adds the perfect crunch. Trust me, once you take a bite, you’ll be planning your next occasion just to make this delightful treat!
Ingredients List
Gathering the right ingredients is key to making the most delicious Red Velvet Cheesecake. Here’s what you’ll need:
- 1 1/2 cups chocolate cookie crumbs (you can use store-bought or crush your favorite chocolate cookies)
- 1/2 cup unsalted butter, melted (this helps bind the crust together perfectly)
- 2 cups cream cheese, softened (make sure it’s at room temperature for easy mixing)
- 1 cup granulated sugar (this adds the right amount of sweetness)
- 3 large eggs (these will give the cheesecake its structure)
- 1/2 cup sour cream (for that creamy texture and tanginess)
- 1/4 cup milk (helps to achieve a smooth and pourable batter)
- 2 tablespoons cocoa powder (this enhances the chocolate flavor)
- 1 tablespoon red food coloring (this is what gives it that stunning red hue)
- 1 teaspoon vanilla extract (for a warm, aromatic finish)
With these ingredients ready to go, you’ll be well on your way to creating a slice of heaven!
How to Prepare Red Velvet Cheesecake
Now, let’s dive into the magic of making this Red Velvet Cheesecake! I promise you, it’s a lot easier than it sounds, and the result is absolutely worth it. Here’s how to make it step-by-step:
- First, preheat your oven to 325°F (160°C). This is important because you want the oven nice and hot for that perfect bake!
- While the oven is warming up, grab a mixing bowl and combine the chocolate cookie crumbs with the melted unsalted butter. Mix it well until the crumbs are fully coated. Then, press this mixture firmly into the bottom of your springform pan. You want a solid crust, so don’t be shy!
- In a large bowl, beat the softened cream cheese and granulated sugar together until it’s super smooth and creamy. This is where the magic starts to happen!
- Next, add the large eggs one at a time. Make sure to mix well after each addition. This helps incorporate air into the batter, giving it that light texture we love.
- Then, stir in the sour cream, milk, cocoa powder, red food coloring, and vanilla extract. Mix until everything is well combined. Your batter will be a beautiful, vibrant red!
- Pour this luscious mixture over the crust in your springform pan, smoothing it out gently with a spatula.
- Now, it’s time to bake! Place the pan in your preheated oven and let it bake for about 60 minutes. You’ll know it’s done when the center is set but still has a slight jiggle—it’ll firm up as it cools.
- Once it’s done baking, remove it from the oven and let it cool to room temperature. After that, pop it in the fridge for at least 4 hours (or overnight if you can wait!). This chilling time is crucial for the flavors to meld and for the cheesecake to set up perfectly.
And there you go! Follow these steps, and you’ll have a stunning Red Velvet Cheesecake that’s ready to impress. I can’t wait for you to taste it!
Why You’ll Love This Recipe
- Quick Prep: You can whip this up in no time—just 20 minutes of prep before it goes in the oven!
- Rich Flavor: The combination of creamy cheesecake and the subtle cocoa flavor creates a decadent dessert experience.
- Visually Appealing: That stunning red color makes it a showstopper on any table; it’s almost too pretty to eat!
- Easy to Make: With straightforward steps, even beginner bakers can create this delightful cheesecake with confidence.
- Perfect for Celebrations: Whether it’s a birthday, anniversary, or holiday, this Red Velvet Cheesecake is sure to impress your guests!
Tips for Success
Alright, my friend, let’s make sure your Red Velvet Cheesecake turns out absolutely perfect! Here are some expert tips that I’ve gathered from my own baking adventures:
- Use Room Temperature Ingredients: This is a game-changer! Make sure your cream cheese, sour cream, and eggs are at room temperature before you start mixing. It helps everything blend together smoothly and prevents lumps.
- Check for Doneness: When your cheesecake is baking, keep an eye on it! It’s done when the edges are set and the center has a slight jiggle. If it looks too wobbly, give it a few more minutes, but be careful not to overbake, as it can crack.
- Cooling Time is Key: After baking, let your cheesecake cool in the pan for about an hour at room temperature before transferring it to the fridge. This gradual cooling helps prevent cracks and ensures a silky texture.
- Chill, Chill, Chill: Don’t skip the chilling part! Refrigerate your cheesecake for at least 4 hours, but overnight is even better. This not only helps it set up properly but also allows the flavors to develop beautifully.
- Don’t Rush the Slicing: When it’s time to serve, use a sharp knife to cut clean slices. Wipe the knife with a damp cloth between cuts for neat, beautiful slices. Your guests will appreciate the presentation!
Follow these tips, and you’ll be well on your way to creating a stunning Red Velvet Cheesecake that’s sure to wow everyone! Happy baking!
Variations of Red Velvet Cheesecake
If you’re feeling adventurous, there are so many fun ways to switch things up with your Red Velvet Cheesecake! Here are some delightful variations that I absolutely love:
- Different Crust Options: While the chocolate cookie crust is divine, you can experiment with a classic graham cracker crust for a lighter twist. Or, try using crushed Oreo cookies for an even richer chocolate flavor!
- Add Chocolate Chips: For an extra chocolatey kick, fold in some semi-sweet or dark chocolate chips into the batter before pouring it over the crust. They’ll melt slightly and add delightful pockets of gooeyness.
- Incorporate Nuts: Chopped pecans or walnuts can add a lovely crunch and nutty flavor. Mix them into the crust or sprinkle on top before serving for a delicious contrast in texture.
- Layer with Fruit: Consider adding a layer of fresh raspberries or strawberries on top for a fruity twist. Not only does it look gorgeous, but it also adds a refreshing balance to the rich cheesecake.
- Cheesecake Bars: To make cheesecake bars instead of a round cake, pour the batter into a lined baking dish. Adjust the baking time slightly, and when it’s done, cut them into squares for easy serving!
These variations can really take your Red Velvet Cheesecake to the next level. So don’t hesitate to get creative and make it your own! I can’t wait to hear which version you try!
Serving Suggestions
Now that you’ve made this gorgeous Red Velvet Cheesecake, let’s talk about what to serve alongside it to really elevate the experience! Trust me, pairing it with the right accompaniments can make all the difference.
- Coffee: A rich cup of coffee is a classic choice. The bold flavors of a dark roast perfectly complement the creaminess of the cheesecake, making each bite even more indulgent!
- Dessert Wines: If you’re feeling fancy, a glass of dessert wine like a late harvest Riesling or Port can add a lovely sweetness that pairs beautifully with the chocolatey notes of the cheesecake.
- Fresh Fruit: Slices of fresh strawberries, raspberries, or even a tangy citrus salad can cut through the richness of the cheesecake and add a delightful freshness and color to your plate.
- Whipped Cream: A dollop of freshly whipped cream on top is always a winner! You can even flavor it with a hint of vanilla or cocoa powder for an extra touch.
- Chocolate Shavings: For a touch of elegance, sprinkle some chocolate shavings over the top just before serving. It adds a nice visual appeal and a little extra chocolate goodness!
These serving suggestions not only enhance the flavors of your Red Velvet Cheesecake but also create a delightful presentation that’s sure to impress. I can’t wait for you to try them out and see how they elevate your dessert experience!
Storage & Reheating Instructions
Once you’ve indulged in your delicious Red Velvet Cheesecake, you’ll want to make sure it stays fresh for as long as possible! Storing it properly is super simple, and it ensures you can enjoy those tasty leftovers later.
- Refrigeration: Keep your cheesecake in the refrigerator in an airtight container or cover it tightly with plastic wrap. This will help prevent any fridge odors from seeping in and keep it nice and fresh. It should last for about 5 days—if it lasts that long!
- Freezing: If you want to keep your cheesecake for a longer period, you can freeze it! Just slice it up and wrap each piece individually in plastic wrap, then place them in a freezer-safe container. It can be frozen for up to 2 months. Just remember to label it so you don’t forget about it!
- Thawing: When you’re ready to enjoy your frozen cheesecake, simply transfer it to the refrigerator to thaw overnight. This keeps the texture nice and creamy. Don’t rush it—thawing at room temperature can make it too soft and change that perfect consistency.
- Reheating: Generally, cheesecake is best served chilled, so there’s no need for reheating. However, if you want to serve it warm, you can pop individual slices in the microwave for about 10-15 seconds. Just be careful not to overheat it, as that can make it lose its lovely texture!
With these simple storage tips, you can savor the delightful flavors of your Red Velvet Cheesecake whenever the craving strikes! Enjoy every last bite, my friend!
Nutritional Information
Understanding the nutritional values of your Red Velvet Cheesecake can help you enjoy it while keeping track of your dietary needs. Here’s the estimated nutritional breakdown per serving:
- Calories: 350
- Sugar: 25g
- Sodium: 300mg
- Fat: 22g
- Saturated Fat: 12g
- Unsaturated Fat: 8g
- Trans Fat: 0g
- Carbohydrates: 30g
- Fiber: 1g
- Protein: 5g
- Cholesterol: 90mg
Keep in mind that these values can vary slightly based on the specific ingredients you use. But knowing this nutritional information can help you enjoy your cheesecake guilt-free, whether it’s a special occasion or just a sweet treat for yourself!
FAQ Section
Can I use low-fat cream cheese instead of regular cream cheese?
Yes, you can use low-fat cream cheese, but keep in mind that it may affect the texture and richness of your Red Velvet Cheesecake. I recommend sticking with regular for the best results if you want that creamy indulgence!
How do I store leftover Red Velvet Cheesecake?
To keep your cheesecake fresh, store it in the refrigerator in an airtight container or cover it tightly with plastic wrap. It should stay delicious for about 5 days. Trust me, you’ll want to savor those leftovers!
Can I freeze Red Velvet Cheesecake?
Absolutely! If you want to save some for later, slice the cheesecake and wrap each piece in plastic wrap, then place them in a freezer-safe container. It can be frozen for up to 2 months. Just remember to label it so you don’t forget about it!
What can I use instead of red food coloring?
If you prefer a natural alternative, you can use beet juice or powder to achieve a similar red hue. Just be aware that it may alter the flavor slightly, but it’s a great option if you’re looking to avoid artificial colors!
How many servings does this recipe make?
This recipe yields about 10 servings, depending on how generously you slice it. Perfect for sharing at gatherings or just indulging a little more yourself!
Red Velvet Cheesecake: 7 Irresistible Secrets to Delight
- Prep Time: 20 minutes
- Cook Time: 60 minutes
- Total Time: 4 hours 80 minutes
- Yield: 10 servings 1x
- Category: Dessert
- Method: Baking
- Cuisine: American
- Diet: Vegetarian
Description
A rich and creamy red velvet cheesecake with a chocolate cookie crust.
Ingredients
- 1 1/2 cups chocolate cookie crumbs
- 1/2 cup unsalted butter, melted
- 2 cups cream cheese, softened
- 1 cup granulated sugar
- 3 large eggs
- 1/2 cup sour cream
- 1/4 cup milk
- 2 tablespoons cocoa powder
- 1 tablespoon red food coloring
- 1 teaspoon vanilla extract
Instructions
- Preheat the oven to 325°F (160°C).
- Mix cookie crumbs and melted butter. Press into the bottom of a springform pan.
- In a bowl, beat cream cheese and sugar until smooth.
- Add eggs one at a time, mixing well after each addition.
- Stir in sour cream, milk, cocoa powder, red food coloring, and vanilla.
- Pour the mixture over the crust.
- Bake for 60 minutes or until the center is set.
- Let it cool, then refrigerate for at least 4 hours before serving.
Notes
- Use room temperature ingredients for best results.
- Top with whipped cream or chocolate shavings if desired.
- Store leftovers in the refrigerator.
Nutrition
- Serving Size: 1 slice
- Calories: 350
- Sugar: 25g
- Sodium: 300mg
- Fat: 22g
- Saturated Fat: 12g
- Unsaturated Fat: 8g
- Trans Fat: 0g
- Carbohydrates: 30g
- Fiber: 1g
- Protein: 5g
- Cholesterol: 90mg
Keywords: Red Velvet Cheesecake