
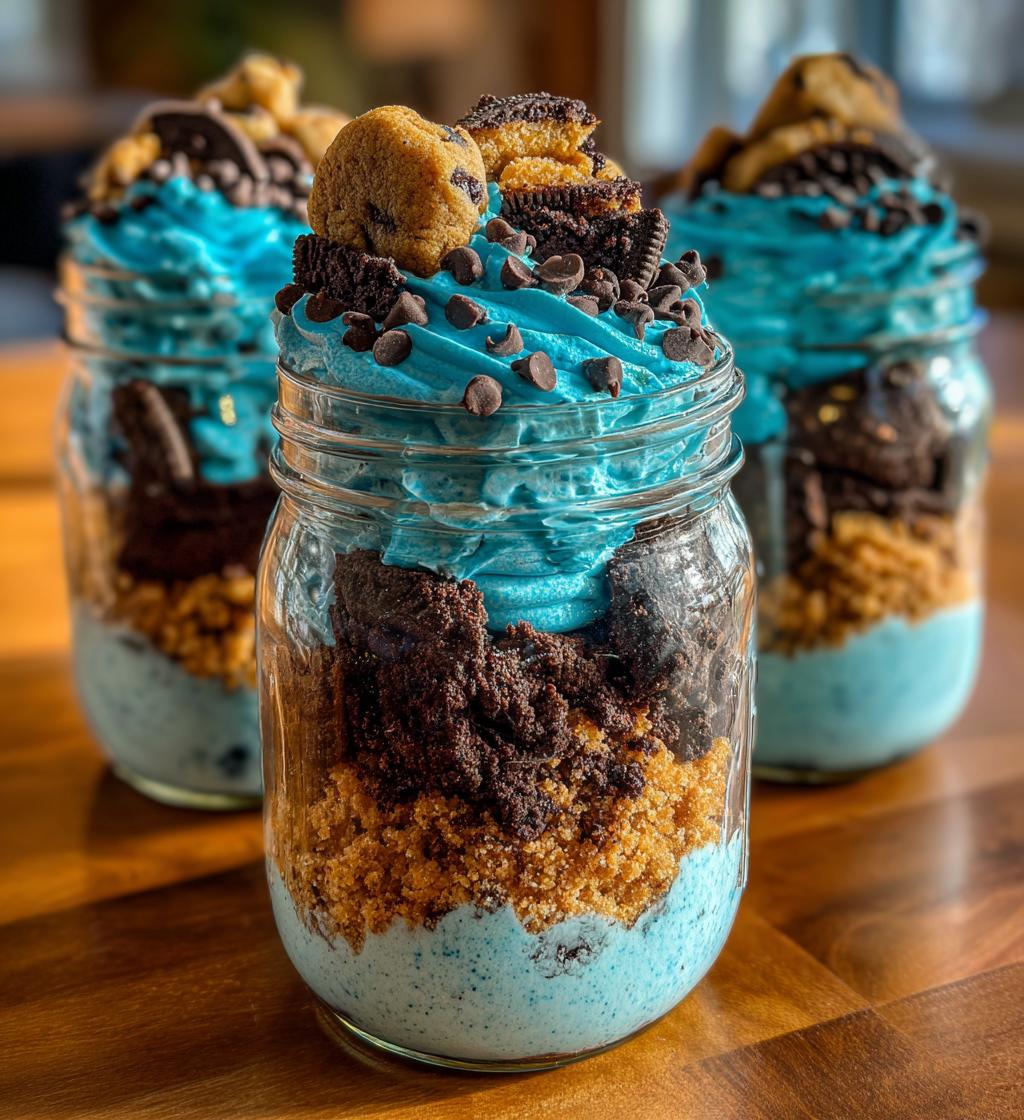
Oh my goodness, let me tell you about the joy that is cookie monster cake jars! These delightful little treats are not only vibrant and eye-catching with their bright blue frosting, but they also pack a delicious punch of flavor that’ll make you swoon! Picture this: layers of moist cake, crushed chocolate chip cookies, and fluffy blue frosting all nestled in a cute jar. It’s like a party in your mouth! I first stumbled upon this idea at a friend’s birthday bash, and I was instantly hooked. The combination of textures is just heavenly—crunchy cookie bits mixed with soft cake and creamy frosting? Yes, please!
The best part is that they’re super easy to make and perfect for any occasion, whether it’s a casual get-together or a festive celebration. Trust me, once you’ve had a bite, you’ll be dreaming up excuses to whip these up again. So, if you’re looking to impress your friends or just treat yourself to something sweet, these cookie monster cake jars are the way to go!
Ingredients for Cookie Monster Cake Jars
Alright, let’s gather our goodies! Here’s what you’ll need to create these adorable cookie monster cake jars. I promise, these ingredients are simple and you might even have a few of them in your pantry already!
- 1 cup all-purpose flour
- 1/2 cup sugar
- 1/2 cup unsalted butter, softened
- 2 large eggs
- 1 tsp vanilla extract
- 1/2 tsp baking powder
- 1/4 tsp salt
- 1 cup blue frosting (store-bought or homemade, your choice!)
- 1 cup crushed chocolate chip cookies (grab your favorites!)
- 1/2 cup mini chocolate chips (because who doesn’t love a little extra chocolate?)
Make sure your butter is softened—it’ll cream better with the sugar that way. And don’t be shy about using the cookies you love most; it really makes a difference in flavor! Now that we’ve got everything ready, we’re all set for the deliciousness to come!
How to Prepare Cookie Monster Cake Jars
Let’s dive into the fun part—making these cookie monster cake jars! I’m so excited to share this step-by-step guide with you. You’ll see just how easy it is to create these delicious treats that’ll have everyone asking for seconds!
Step 1: Preheat and Cream
First things first, preheat your oven to 350°F (175°C). This is super important because we want that cake to rise perfectly! While that’s warming up, grab a large mixing bowl and your trusty hand mixer (or stand mixer, if you’re feeling fancy). Start by creaming together the softened butter and sugar until it’s light and fluffy—about 2-3 minutes. Oh, the smell of butter and sugar mixing together is simply divine!
Step 2: Mix the Wet Ingredients
Now, it’s time to add in those two large eggs and the vanilla extract. Make sure to mix well after each addition! You want everything to be combined smoothly. I like to beat the eggs one at a time, just to ensure they’re well incorporated. Trust me, this makes a difference in the final texture of the cake!
Step 3: Combine Dry Ingredients
In another bowl, whisk together the all-purpose flour, baking powder, and salt. This step is crucial because it helps ensure that the baking powder is evenly distributed throughout the flour. If you skip this, you might end up with little pockets of baking powder in your cake! Once those dry ingredients are mixed, it’s time to combine them with your wet mixture.
Step 4: Bake the Cake
Now, pour that lovely batter into a greased baking pan. I like to use a 9-inch square pan for this, but any similar size will work! Spread the batter evenly and pop it into your preheated oven. Bake for about 25 minutes, or until the top is golden brown and a toothpick inserted in the center comes out clean. Your kitchen will smell heavenly while it bakes—seriously, get ready for a sweet aroma!
Step 5: Assemble the Cake Jars
Once the cake has cooled completely (this is important, so resist the urge to dig in!), it’s time to get those jars ready. Start by crumbling some of the chocolate chip cookies at the bottom of each jar. Then, add a layer of cake followed by a generous dollop of blue frosting. Repeat the layers until your jars are filled to the brim! Top each jar with mini chocolate chips for that extra touch. And voilà! You’ve got yourself some adorable cookie monster cake jars that are as fun to look at as they are to eat!
Why You’ll Love This Recipe
- They’re super quick to whip up—perfect for when you’re in a pinch for a sweet treat!
- Each jar is a delightful individual serving, making them great for sharing or enjoying solo.
- The vibrant blue frosting and cookie layers make these jars visually stunning and fun!
- They’re incredibly versatile; you can switch up the frosting flavors, or use different types of cookies for a new twist.
- Perfect for parties! They add a playful touch to any dessert table and are sure to impress your guests.
- Easy to store and transport—just pop the lids on and you’re good to go!
- Layering the ingredients in jars adds an element of surprise and makes each bite exciting.
- They’re a fantastic way to get creative in the kitchen while still being simple enough for beginners!
Tips for Success
Alright, my fellow bakers, let’s make sure your cookie monster cake jars turn out absolutely perfect! Here are some of my top tips to ensure your treats are a hit every time.
- Don’t rush the cooling: After baking, it’s crucial to let that cake cool completely before you start layering. If you don’t, the frosting might melt and create a gooey mess instead of those beautiful layers we’re aiming for!
- Check your oven temperature: Every oven is a bit different, so if you find that cakes tend to bake unevenly, it might be worth investing in an oven thermometer. This can help ensure that you’re baking at just the right temperature for that perfect rise!
- Layer it right: When assembling your jars, I like to start with a layer of cookie crumbs at the bottom for a nice crunchy base. It sets a solid foundation and keeps the layers from mixing too much. Trust me; it makes a world of difference!
- Mix well, but don’t overdo it: When combining your wet and dry ingredients, mix until just combined. Overmixing can lead to a dense cake, and we want it light and fluffy!
- Go wild with toppings: Don’t be afraid to play around with the toppings or the types of cookies you use. Add some sprinkles, or even a drizzle of chocolate or caramel sauce for an extra special touch!
- Keep it fresh: If you’re not serving the jars right away, store them in the refrigerator until you’re ready to dig in. They’ll stay fresh and tasty for a few days, but they’re definitely best enjoyed within a week.
- Have fun with it: Baking should be a joy, so get creative! Try different frosting colors or cookie flavors based on the season or occasion. The more you experiment, the more you’ll discover your favorites!
With these tips in your back pocket, you’re all set to impress everyone with your delicious cookie monster cake jars. Happy baking!
Nutritional Information
Here’s the scoop on the nutritional info for each delightful cookie monster cake jar! Keep in mind that these values are estimates and can vary based on the specific ingredients you use and how you layer your jars. But just to give you a general idea, here’s what you can expect:
- Serving Size: 1 jar
- Calories: 350
- Total Fat: 18g
- Saturated Fat: 10g
- Unsaturated Fat: 6g
- Trans Fat: 0g
- Cholesterol: 50mg
- Sodium: 150mg
- Total Carbohydrates: 45g
- Fiber: 1g
- Sugars: 25g
- Protein: 4g
These tasty treats are a fun way to indulge your sweet tooth while enjoying a little bit of everything in one jar. Just remember, like all desserts, moderation is key! Enjoy your cookie monster cake jars guilt-free, but keep an eye on those calories if you’re counting. Happy indulging!
FAQ About Cookie Monster Cake Jars
Can I use gluten-free flour?
Absolutely! You can substitute regular all-purpose flour with a gluten-free flour blend, and it should work just fine. Just make sure to choose a blend that’s designed for baking to get that fluffy texture we love. I’ve done this myself, and it turns out delicious—just as good as the original!
How can I store leftover cake jars?
Storing your cookie monster cake jars is super easy! Just pop the lids on those adorable jars and keep them in the refrigerator. They’ll stay fresh for up to a week, but I promise they’ll be gone long before that! If you find yourself with leftovers, just make sure they’re sealed tight to keep that frosting fluffy and the cookies crunchy.
Can I use different frosting flavors?
Oh, for sure! The beauty of cookie monster cake jars is their versatility. You can absolutely switch up the frosting flavors to match your mood or any occasion. Think chocolate, vanilla, or even peanut butter! Each variation adds a unique twist, and trust me, your taste buds will thank you for the experimentation. Just remember to keep the blue frosting if you want to maintain that classic cookie monster look!
Serving Suggestions
When it comes to serving these delightful cookie monster cake jars, the sky’s the limit! They’re already a hit on their own, but if you want to take things up a notch, here are a few fun ideas to elevate your dessert game.
- Pair with Ice Cream: You can never go wrong with a scoop of vanilla or cookies and cream ice cream alongside your cake jars. The creamy ice cream complements the sweetness of the cake and frosting perfectly!
- Garnish with Fresh Fruit: Slices of strawberries or a handful of blueberries can add a refreshing balance to the sweetness. Plus, they look gorgeous next to the bright blue frosting!
- Themed Parties: If you’re throwing a birthday bash or a fun gathering, consider using themed decorations that match the cookie monster vibe. Think blue tablecloths, fun cookie monster images, and maybe even some cute little monster cupcakes to go along with your jars!
- Personalized Labels: For a unique touch, create little labels for each jar. You could write guests’ names on them or include a fun cookie monster quote. It adds a personal flair that everyone will love!
- Mini Dessert Table: Set up a mini dessert table featuring your cookie monster cake jars alongside other fun treats like cookie bites, brownies, or even mini pies. It makes for an eye-catching display and gives guests plenty of options!
- Serve with a Smile: Don’t forget to present these jars with a big smile and a little enthusiasm! Your excitement about the treats will be contagious, and everyone will be eager to dig in!
Whether you’re enjoying these cookie monster cake jars at a party or just as a sweet treat at home, they’re sure to bring smiles all around. So get creative with your serving ideas and make every bite a little celebration!
Print
Cookie Monster Cake Jars: 7 Delightful Treats to Savor
- Prep Time: 20 minutes
- Cook Time: 25 minutes
- Total Time: 45 minutes
- Yield: 4 jars 1x
- Category: Dessert
- Method: Baking
- Cuisine: American
- Diet: Vegetarian
Description
Delicious cookie monster cake jars layered with cookie crumbs and blue frosting.
Ingredients
- 1 cup all-purpose flour
- 1/2 cup sugar
- 1/2 cup unsalted butter
- 2 large eggs
- 1 tsp vanilla extract
- 1/2 tsp baking powder
- 1/4 tsp salt
- 1 cup blue frosting
- 1 cup crushed chocolate chip cookies
- 1/2 cup mini chocolate chips
Instructions
- Preheat the oven to 350°F (175°C).
- In a bowl, cream together butter and sugar.
- Add eggs and vanilla, mix well.
- In another bowl, combine flour, baking powder, and salt.
- Gradually add dry ingredients to wet mixture.
- Pour batter into a greased baking pan.
- Bake for 25 minutes or until golden brown.
- Let the cake cool completely.
- Layer cookie crumbs, cake, and frosting in jars.
- Top with mini chocolate chips.
Notes
- Store in the refrigerator.
- Use any type of frosting for flavor variations.
- Can substitute gluten-free flour if needed.
Nutrition
- Serving Size: 1 jar
- Calories: 350
- Sugar: 25g
- Sodium: 150mg
- Fat: 18g
- Saturated Fat: 10g
- Unsaturated Fat: 6g
- Trans Fat: 0g
- Carbohydrates: 45g
- Fiber: 1g
- Protein: 4g
- Cholesterol: 50mg
Keywords: cookie monster cake jars, dessert, cake jars, cookies