
Oh, the joy of the holiday season! There’s something truly magical about sharing a christmas dessert tray brimming with colorful, sweet treats that just scream celebration. I remember as a kid, my family would gather around the kitchen, laughter filling the air as we baked our favorite festive goodies. The smell of spices, sugar, and butter wafting through the house made it feel like Christmas was in every corner! This dessert tray is not just a collection of sweets; it’s a festive tradition, a way to bring everyone together and spread some holiday cheer. Trust me, when you set this tray out at your next gathering, it’ll be the centerpiece of joy and deliciousness that everyone will rave about! So, let’s dive into creating this delightful assortment that’s perfect for sharing and celebrating the season.
Ingredients List
- 1 cup of granulated sugar
- 2 cups of all-purpose flour
- 1/2 cup of unsalted butter, softened
- 2 large eggs
- 1 tsp of pure vanilla extract
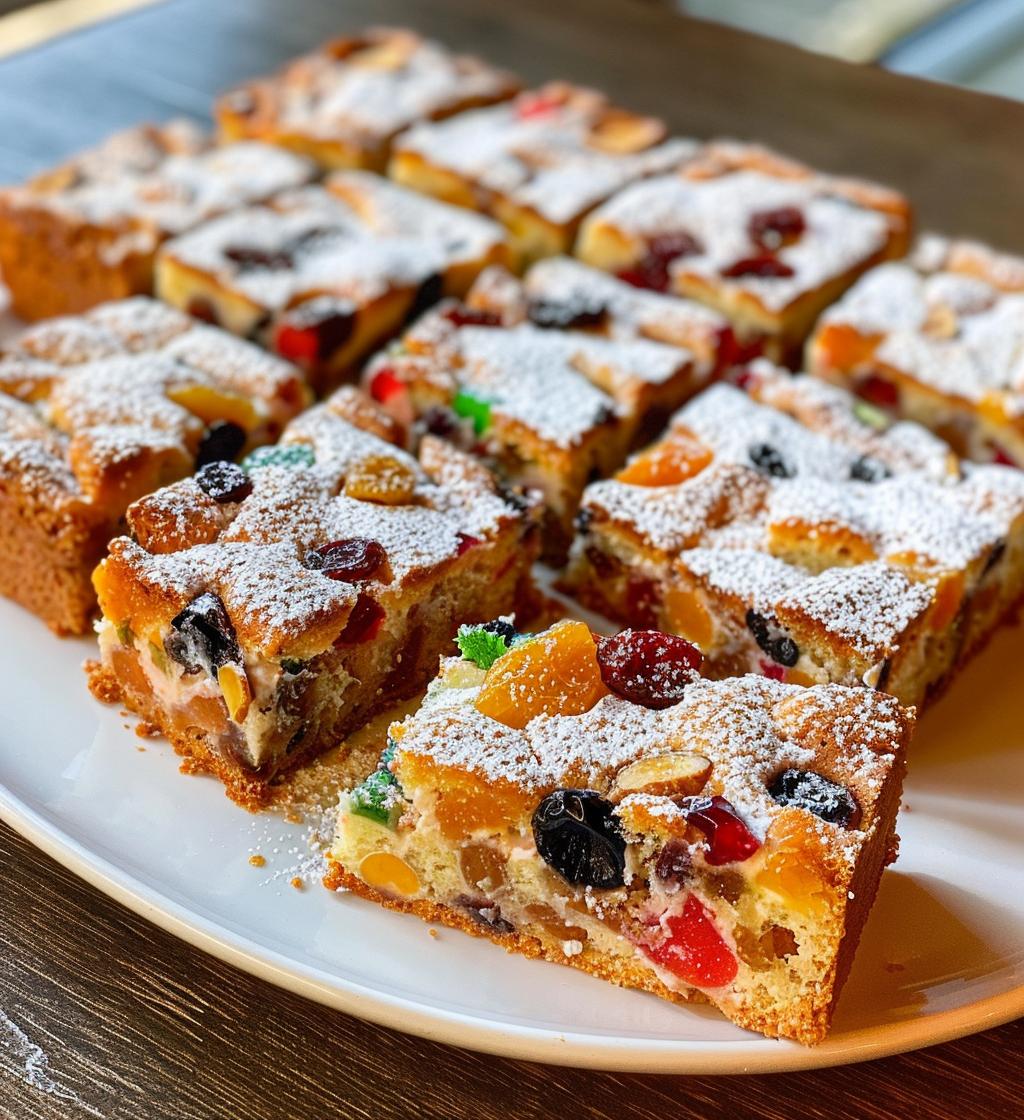
- 1 cup of mixed dried fruits, chopped (think cranberries, apricots, and raisins for that festive flair!)
- 1/2 cup of nuts, chopped (I love using walnuts or pecans for that crunchy texture!)
- 1 tsp of baking powder
- 1/2 tsp of salt
How to Prepare Instructions
Preheat and Prepare
First things first, let’s get that oven preheating to a cozy 350°F (175°C). This is super important because we want our treats to bake evenly and come out just right! While that’s heating up, grab a greased baking dish—trust me, greasing it is crucial to ensure our delicious creation doesn’t stick. I like to use a little butter or cooking spray to coat the bottom and sides. This way, once it’s baked, we can easily pull those yummy pieces out without any fuss!
Mixing Ingredients
Now, let’s get mixing! In a large bowl, cream together the granulated sugar and softened butter until it’s light and fluffy—this usually takes about 2-3 minutes. You’ll know it’s ready when it looks pale and creamy. Next, add in those two large eggs and the pure vanilla extract, mixing until everything is well combined. In a separate bowl, whisk together the all-purpose flour, baking powder, and salt. Gradually add this dry mixture to the wet mixture, stirring gently until just combined. Be careful not to overmix; we want a tender crumb! Finally, fold in the chopped dried fruits and nuts, making sure they’re evenly distributed throughout the batter.
Baking the Dessert
Alright, it’s time to pour that beautiful batter into your prepared baking dish! Spread it out evenly, and then pop it into the preheated oven. Bake for about 30-35 minutes, but keep an eye on it! You’ll know it’s done when a toothpick inserted into the center comes out clean or with just a few crumbs. Once it’s baked to perfection, let it cool in the dish for a bit before transferring it to a wire rack. This cooling step is vital because it helps set the texture and makes it easier to cut into those perfect pieces for your christmas dessert tray!
Nutritional Information
Now, while we’re all about the joy of baking and sharing, it’s also good to know what we’re indulging in, right? So, here’s a rough estimate of the nutritional values for each piece of this festive treat. Keep in mind that these values can vary based on the specific ingredients you use, but here’s what you can expect:
- Calories: 150
- Total Fat: 5g
- Saturated Fat: 2g
- Unsaturated Fat: 3g
- Trans Fat: 0g
- Cholesterol: 30mg
- Sodium: 50mg
- Total Carbohydrates: 22g
- Dietary Fiber: 2g
- Sugars: 10g
- Protein: 3g
This is a delightful treat to share, and knowing the nutritional breakdown can help you enjoy it even more, especially during the festive season! Just remember, it’s all about balance, and these sweet bites are perfect for spreading cheer!
Why You’ll Love This Recipe
- Quick Preparation: You can whip this up in just about 20 minutes, making it a perfect last-minute addition to your holiday plans!
- Easy to Make: With simple steps and common ingredients, even novice bakers can create this festive treat without any fuss.
- Festive Flavors: The combination of dried fruits and nuts brings a delightful holiday flavor that’s sure to evoke warm memories of Christmas past.
- Versatile for Decorating: Get creative! Dust with powdered sugar, drizzle icing, or even add festive sprinkles for that extra holiday cheer.
- Perfect for Sharing: This dessert is made for gatherings! Slice it into pieces and watch your friends and family gather around for a taste of the season.
Tips for Success
Alright, let’s make sure your christmas dessert tray turns out absolutely spectacular! Here are some of my go-to tips for achieving the best results:
- Ingredient Substitutions: If you’re out of nuts, don’t sweat it! You can swap in seeds like sunflower or pumpkin for that crunch. Or if you want to make it nut-free, just double up on the dried fruits! They’ll still add great texture and flavor.
- Spice It Up: Feel free to add your favorite holiday spices! A teaspoon of cinnamon or nutmeg can elevate the flavors and give your treats that extra festive kick. Just a pinch can transform your dessert into something magical!
- Chop Everything Evenly: When you’re chopping your dried fruits and nuts, try to keep the pieces about the same size. This helps them distribute evenly throughout the batter, ensuring each bite is packed with flavor. Plus, it just looks prettier!
- Don’t Skip the Cooling: Give your baked dessert enough time to cool in the pan before cutting! This helps it set properly, so you get nice clean slices instead of crumbly chaos. Trust me, letting it cool is worth the wait!
- Decorate Festively: Get your creative juices flowing when it comes to decorating! A light dusting of powdered sugar can make it look like a winter wonderland. You can also drizzle some icing on top or sprinkle edible glitter for that extra festive flair—because who doesn’t love a little sparkle?
- Make Ahead: This dessert is perfect for making a day in advance! It actually tastes better after sitting for a while, as the flavors have time to meld together. Just store it in an airtight container, and you’ll be ready to impress your guests!
With these tips, you’ll be all set to create a christmas dessert tray that not only tastes amazing but looks stunning too! Happy baking, my friend!
Variations
One of the best things about this christmas dessert tray is how easily you can mix it up to suit your taste or what you have on hand! Here are some fun variations to consider:
- Dried Fruit Medley: Instead of the typical mix, try using candied ginger, figs, or even some tropical dried fruits like mango or pineapple. Each brings its own unique flavor and texture to your dessert!
- Nutty Alternatives: If you’re not a fan of walnuts or pecans, experiment with slivered almonds, hazelnuts, or even macadamia nuts for a buttery crunch. Each nut adds its own vibe, so feel free to get creative!
- Spice It Up: Wanna give your dessert a little pizzazz? Add warming spices like ground cinnamon, nutmeg, or even a hint of allspice to the batter. Just a teaspoon can make your treats sing with festive cheer!
- Chocolate Chunks: For a touch of indulgence, fold in some semi-sweet or dark chocolate chunks. They melt slightly during baking, making every bite a delightful surprise!
- Gluten-Free Option: If you’re looking to make this a gluten-free treat, swap the all-purpose flour for a gluten-free blend. Just make sure it’s a 1:1 ratio blend for the best results!
- Fruity Zest: Brighten things up by adding some citrus zest—like lemon or orange—into the batter. It’ll give your dessert a fresh burst of flavor that pairs beautifully with the sweetness!
These variations not only keep things exciting but also allow you to personalize your christmas dessert tray to fit your style. So, don’t hesitate to experiment and make this recipe your own! Happy baking!
Storage & Reheating Instructions
Now that you’ve created this delightful christmas dessert tray, let’s talk about how to keep those sweet treats fresh and fabulous! After your dessert has completely cooled, you’ll want to store it properly to maintain that lovely texture and flavor. Here’s what I do:
- Storing Leftovers: Place any leftover pieces in an airtight container or wrap them tightly in plastic wrap. This keeps them from drying out and helps preserve their deliciousness. If you have a few pieces left, you can also separate them with parchment paper so they don’t stick together.
- Refrigeration: You can store your dessert in the fridge for up to a week. Just make sure it’s well covered! The cool temperature can actually enhance the flavors as they meld together over time.
- Freezing for Later: If you want to save some for a later date, feel free to freeze individual pieces! Just wrap each piece tightly in plastic wrap and then place them in a freezer-safe bag. They can be frozen for up to two months. When you’re ready to enjoy them, let them thaw in the fridge overnight.
When it comes to reheating, be gentle! If you’d like to warm up a piece, pop it in the microwave for about 10-15 seconds. Just enough to take the chill off and make it slightly soft again. You can also reheat it in the oven at 300°F (150°C) for about 5-10 minutes. This method helps keep that wonderful texture intact while giving it a nice warm-up.
So, whether you’re savoring them fresh or pulling them from the freezer for a sweet treat later, your christmas dessert tray will be just as delightful as when you first made it. Enjoy every bite!
Serving Suggestions
Now that your christmas dessert tray is ready, let’s talk about how to make your festive spread even more delightful! The right beverages and complementary dishes can really elevate the experience and bring everyone together. Here are some of my favorite ideas:
- Hot Cocoa or Mulled Wine: What’s better than a cozy mug of hot cocoa topped with whipped cream? Or, for the adults, a warm glass of mulled wine with spices like cinnamon and cloves? Both are perfect for sipping while enjoying those sweet treats!
- Freshly Brewed Coffee or Tea: A nice cup of coffee or a fragrant holiday tea can be the ideal pairing for the rich flavors of your dessert. I love serving a spiced chai or a smooth peppermint tea—it adds a lovely warmth to the gathering!
- Festive Fruit Platter: Balance out the sweetness of your tray with a colorful fruit platter. Think seasonal fruits like pomegranates, clementines, or even some slices of tart apple. They provide a refreshing contrast that everyone will appreciate!
- Cheese Board: Create a cheese board with a selection of cheeses, crackers, and some honey or fig jam. The savory notes of the cheese can beautifully complement the sweetness of your desserts, and it makes for a lovely presentation!
- Ice Cream or Whipped Cream: For an extra indulgence, serve your treats with a scoop of vanilla ice cream or a dollop of freshly whipped cream. It adds a creamy texture that pairs perfectly with the fruity and nutty flavors of the dessert!
- Holiday Cookies: If you’re feeling extra festive, why not include some classic holiday cookies like gingerbread or sugar cookies on the side? It creates a fun mix of textures and flavors for your guests to enjoy!
With these serving suggestions, your christmas dessert tray will not only shine as the star of the show but will also create an inviting atmosphere that brings everyone together. Enjoy the festivities and the sweet moments shared around the table!
Print
Christmas Dessert Tray: 7 Joyful Treats to Share
- Prep Time: 20 minutes
- Cook Time: 35 minutes
- Total Time: 55 minutes
- Yield: 12 servings 1x
- Category: Dessert
- Method: Baking
- Cuisine: American
- Diet: Vegetarian
Description
A festive assortment of sweet treats perfect for the holiday season.
Ingredients
- 1 cup of sugar
- 2 cups of flour
- 1/2 cup of butter
- 2 eggs
- 1 tsp of vanilla extract
- 1 cup of mixed dried fruits
- 1/2 cup of nuts
- 1 tsp of baking powder
- 1/2 tsp of salt
Instructions
- Preheat your oven to 350°F (175°C).
- In a bowl, cream together the sugar and butter.
- Add the eggs and vanilla extract, mixing well.
- In another bowl, combine the flour, baking powder, and salt.
- Gradually add the dry ingredients to the wet mixture.
- Fold in the dried fruits and nuts.
- Pour the batter into a greased baking dish.
- Bake for 30-35 minutes or until a toothpick comes out clean.
- Let it cool before cutting into pieces for the tray.
Notes
- Feel free to add your favorite holiday spices.
- Decorate with icing or powdered sugar for a festive look.
- This tray can be made a day in advance.
Nutrition
- Serving Size: 1 piece
- Calories: 150
- Sugar: 10g
- Sodium: 50mg
- Fat: 5g
- Saturated Fat: 2g
- Unsaturated Fat: 3g
- Trans Fat: 0g
- Carbohydrates: 22g
- Fiber: 2g
- Protein: 3g
- Cholesterol: 30mg
Keywords: christmas dessert tray