
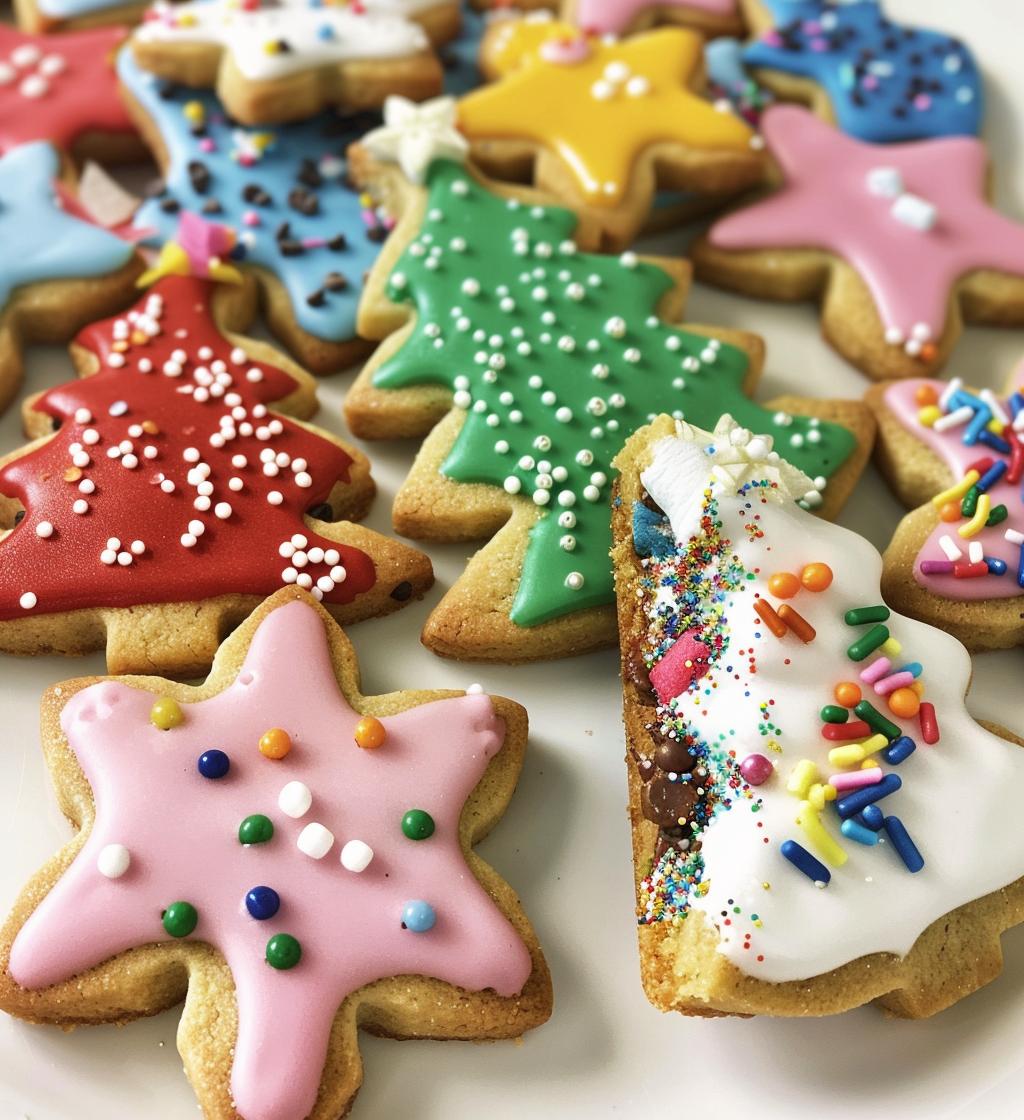
The holiday season is upon us, and you know what that means—it’s time to whip up some festive cheer with cookie decorating! There’s something magical about gathering around the kitchen table, rolling out dough, and letting our creativity run wild. Christmas cookie decorating ideas are not just about creating beautiful treats; they’re about making memories with family and friends. I love how each cookie becomes a canvas for our imaginations, transforming simple sugar cookies into delightful works of art! From colorful icing to a sprinkle of edible glitter, the joy of decorating these little confections brings laughter and warmth to our celebrations. So, let’s dive into the fun of making these festive delights together!
Ingredients List
Gathering the right ingredients is key to creating beautiful and delicious Christmas cookies. Here’s what you’ll need:
- Sugar cookies: You can use store-bought or homemade sugar cookie dough—just make sure they’re cool before you start decorating!
- Royal icing: This icing hardens beautifully, making it perfect for detailed designs. You can whip up a batch easily with powdered sugar, egg whites, and a splash of water.
- Food coloring: Get a variety of colors to make your cookies pop! Gel colors work best, giving you vibrant hues without altering the icing’s consistency.
- Sprinkles: Choose an assortment of festive sprinkles—think stars, snowflakes, or colorful nonpareils—to add a fun crunch and sparkle.
- Edible glitter: Who doesn’t love a little shimmer? Sprinkle it on while the icing is wet for a magical effect!
- Chocolate chips: Use these for added decoration or as a sweet treat nestled on top of your cookies.
- Marshmallows: Mini marshmallows can be adorable snowmen or fluffy accents on your festive designs!
With these ingredients in hand, you’re all set to create a delightful array of decorated cookies that will surely impress your friends and family!
How to Prepare Instructions
Now, let’s get into the fun part—decorating those cookies! Follow these simple steps, and you’ll have a beautifully decorated platter of Christmas cookies in no time.
- Bake your sugar cookies: Preheat your oven according to your cookie dough instructions. Roll out your dough, cut it into festive shapes, and bake them until lightly golden. Let them cool completely on a wire rack. This step is crucial! If they’re still warm, the icing will melt right off.
- Prepare the royal icing: In a mixing bowl, combine powdered sugar, egg whites, and water. Beat until smooth and glossy. You want a consistency that holds its shape but is still spreadable. If it’s too thick, add a tiny bit of water!
- Divide and color your icing: Split your royal icing into several bowls, depending on how many colors you want. Add food coloring to each bowl and mix until you achieve your desired shades. Don’t be afraid to get creative here!
- Outline your cookies: Grab your piping bags (or zip-top bags with a tiny corner snipped off) and fill them with your colored icing. Use a thin tip to outline the edges of each cookie. This creates a barrier for your fill-in icing.
- Fill in the outlines: Once the outlines are done, it’s time to fill them in! Thinning your icing with a bit of water can help it spread nicely within the outlines. Use a toothpick to help spread it evenly if needed.
- Add sprinkles and glitter: While the icing is still wet, sprinkle on your festive toppings. This is where the magic happens! Be generous with the sprinkles and edible glitter for that extra sparkle.
- Get creative with decorations: Use chocolate chips and mini marshmallows to make fun designs—think snowmen or Christmas trees! Let your imagination run wild!
- Let the cookies dry: This step is vital! Allow your decorated cookies to dry completely at room temperature. Depending on the humidity, this may take anywhere from 2 to 6 hours. Patience is key here, so try not to rush this part!
And there you have it! With these steps, you’ll be well on your way to creating a stunning display of decorated Christmas cookies that are almost too pretty to eat—almost!
Why You’ll Love This Recipe
- Fun for the whole family: Decorating Christmas cookies is a joyful activity everyone can enjoy together! It’s a great way to bond and create lasting memories during the holiday season.
- Creative expression: Each cookie becomes a unique masterpiece! You can let your imagination run wild with colors, designs, and toppings—there are no limits to what you can create!
- Festive treat creation: There’s nothing quite like the sight of a beautifully decorated cookie platter at your holiday gatherings. They make the perfect sweet treats to share with friends and family.
- Great for gifting: Wrapped up in a cute box or tin, these cookies make delightful homemade gifts for neighbors, teachers, or anyone who could use a little holiday cheer!
- A fun tradition: Making and decorating cookies can become a cherished holiday tradition, something everyone looks forward to each year. It’s a sweet way to celebrate the season!
Tips for Success
Let’s make sure your cookie decorating experience is as smooth as butter! Here are some of my top tips to ensure your cookies turn out perfectly every time:
- Icing consistency: The secret to great decorating is the right icing consistency! For outlining, your royal icing should be thick enough to hold its shape but still pipe smoothly. For filling, thin it a bit with water until it flows easily but doesn’t run off the cookie. A good test? It should take about 10 seconds for a line drawn through the icing to disappear.
- Color mixing: When it comes to food coloring, remember that a little goes a long way! Start with a drop or two and mix thoroughly. You can always add more if you want a bolder shade. And don’t forget to mix colors to create new hues—think about combining red and white for a pretty pink!
- Using different icing tips: Experiment with various piping tips to achieve different effects! A round tip works great for outlines, while a star tip can create beautiful rosettes or fun decorations. Don’t be afraid to switch it up and try new techniques!
- Practice makes perfect: If you’re new to cookie decorating, don’t stress about making everything perfect on your first try. Each cookie is a chance to learn, so have fun and enjoy the process! You’ll get better with each batch.
- Work in stages: If you have a lot of cookies to decorate, work in stages! Outline a batch, let them dry for a bit, then come back to fill them in. This helps avoid smudging and gives you a clearer workspace.
- Stay patient: I know it’s hard to wait, but letting your cookies dry completely is crucial! Rushing this part can mess up your designs. It’s worth the wait for a beautiful and professional-looking finish!
With these tips in your back pocket, you’ll be ready to create cookie masterpieces that will impress everyone this holiday season. Happy decorating!
Variations
Now that you’ve got the basics down, let’s talk about how to switch things up and get creative with your cookie decorating! The beauty of Christmas cookie decorating is that there are endless possibilities to make each batch unique and exciting. Here are some fun variations to inspire you:
- Theme your cookies: Choose a specific theme for your cookie designs! Think classic Christmas symbols like Christmas trees, snowflakes, or Santa hats. You could even go for a winter wonderland theme with icy blue and white colors!
- Color schemes: Mix and match colors based on your holiday decor or your favorite color palette. Instead of traditional red and green, how about a chic gold and silver combo for a more modern approach? Or go pastel for a whimsical touch!
- Seasonal flavors: Infuse your sugar cookies with seasonal flavors like peppermint, gingerbread, or eggnog. The aroma alone will fill your kitchen with holiday cheer, and you can match your decorations to the flavors!
- Unique toppings: Think outside the box! Instead of just sprinkles, try crushed candy canes for a minty crunch, or drizzle your cookies with chocolate or caramel for an extra indulgent touch. You can even use dried fruit or nuts for a more gourmet look!
- Personalized messages: Write sweet messages or names on cookies using colored icing. These can make adorable place settings for holiday dinners or special gifts for loved ones!
- Layered icing techniques: Try using a wet-on-wet technique where you drop different colors of icing onto wet icing to create beautiful marbled effects. It’s a fun way to add depth and interest to your designs!
With these variations, you can turn your cookie decorating into a festive adventure! Get ready to unleash your creativity and make each cookie a delightful surprise for your family and friends!
Storage & Reheating Instructions
Once you’ve created your stunning decorated cookies, you’ll want to keep them fresh and delicious for as long as possible! Here’s how to store them properly:
- Airtight container: Place your decorated cookies in a single layer in an airtight container. If you have a lot of cookies, you can use parchment paper between layers to prevent them from sticking together.
- Cool, dry place: Store the container in a cool, dry area away from direct sunlight. This helps maintain the icing’s texture and prevents any melting or fading of colors.
- Short-term storage: Decorated cookies can typically be stored at room temperature for up to one week. Just make sure they’re sealed well!
- Freezing for later: If you want to keep your cookies for a longer period, you can freeze them! Place the cookies in a single layer on a baking sheet and freeze until firm. Then, transfer them to an airtight container or freezer bag. They can be frozen for up to three months. Just remember to thaw them at room temperature before serving!
By following these storage tips, you’ll ensure that your beautifully decorated cookies stay fresh and delightful, ready to be enjoyed whenever the holiday cravings hit!
Nutritional Information
Here’s a quick look at the estimated nutritional information for one of your beautifully decorated Christmas cookies. Keep in mind that these values are just a guideline and can vary based on the specific ingredients you use and the size of your cookies:
- Calories: 150
- Fat: 5g
- Saturated Fat: 2g
- Unsaturated Fat: 2g
- Trans Fat: 0g
- Cholesterol: 15mg
- Sodium: 50mg
- Carbohydrates: 22g
- Fiber: 0g
- Sugar: 10g
- Protein: 1g
These cookies are a sweet treat, perfect for indulging during the holiday season! Enjoy them in moderation as part of your festive celebrations.
FAQ Section
Got questions? No worries! Here are some common queries about decorating Christmas cookies, answered just for you:
How long do decorated cookies last?
Decorated cookies can last up to a week at room temperature if stored properly in an airtight container. If you want them to last longer, freezing is an excellent option! They can be frozen for up to three months. Just remember to let them thaw at room temperature before diving in!
Can I use other types of icing?
Absolutely! While royal icing is fantastic for its hardening properties, you can also use buttercream, glaze, or fondant to decorate your cookies. Each type of icing offers a different texture and flavor, so feel free to experiment!
What’s the best way to store leftover decorations?
To keep your leftover decorations fresh, store sprinkles, edible glitter, and any other toppings in airtight containers. Keep them in a cool, dry place away from direct sunlight. They’ll be ready for your next decorating adventure!
Can I make the cookies ahead of time?
Yes! You can bake and decorate your cookies a few days in advance. Just make sure they’re stored properly so they don’t lose their freshness. I often bake my cookies a week ahead and decorate them the day before the celebration!
What if my icing is too thick?
If your icing is too thick to pipe, don’t fret! Just add a tiny bit of water until it reaches the right consistency. Remember, you want it to flow smoothly without being runny. A good rule of thumb is to test it out on a plate!
Can I use natural food coloring?
Yes, natural food coloring is a great option if you prefer to avoid artificial dyes. Just keep in mind that the colors may be less vibrant, but they can still create beautiful results!

Christmas Cookie Decorating Ideas for Magical Memories
- Prep Time: 30 minutes
- Cook Time: 10 minutes
- Total Time: 40 minutes
- Yield: 24 cookies
- Category: Dessert
- Method: Baking and decorating
- Cuisine: American
- Diet: Vegetarian
Description
Fun and creative ideas for decorating Christmas cookies.
Ingredients
- Sugar cookies
- Royal icing
- Food coloring
- Sprinkles
- Edible glitter
- Chocolate chips
- Marshmallows
Instructions
- Bake sugar cookies and let them cool completely.
- Prepare royal icing and divide it into bowls.
- Add food coloring to each bowl for different colors.
- Use piping bags to outline cookies with icing.
- Fill in the outlined areas with thinned icing.
- Add sprinkles and edible glitter while the icing is wet.
- Use chocolate chips and marshmallows for additional decoration.
- Let the cookies dry completely before serving.
Notes
- Use different icing tips for varied designs.
- Experiment with color combinations.
- Store decorated cookies in an airtight container.
Nutrition
- Serving Size: 1 cookie
- Calories: 150
- Sugar: 10g
- Sodium: 50mg
- Fat: 5g
- Saturated Fat: 2g
- Unsaturated Fat: 2g
- Trans Fat: 0g
- Carbohydrates: 22g
- Fiber: 0g
- Protein: 1g
- Cholesterol: 15mg
Keywords: christmas cookie decorating ideas