
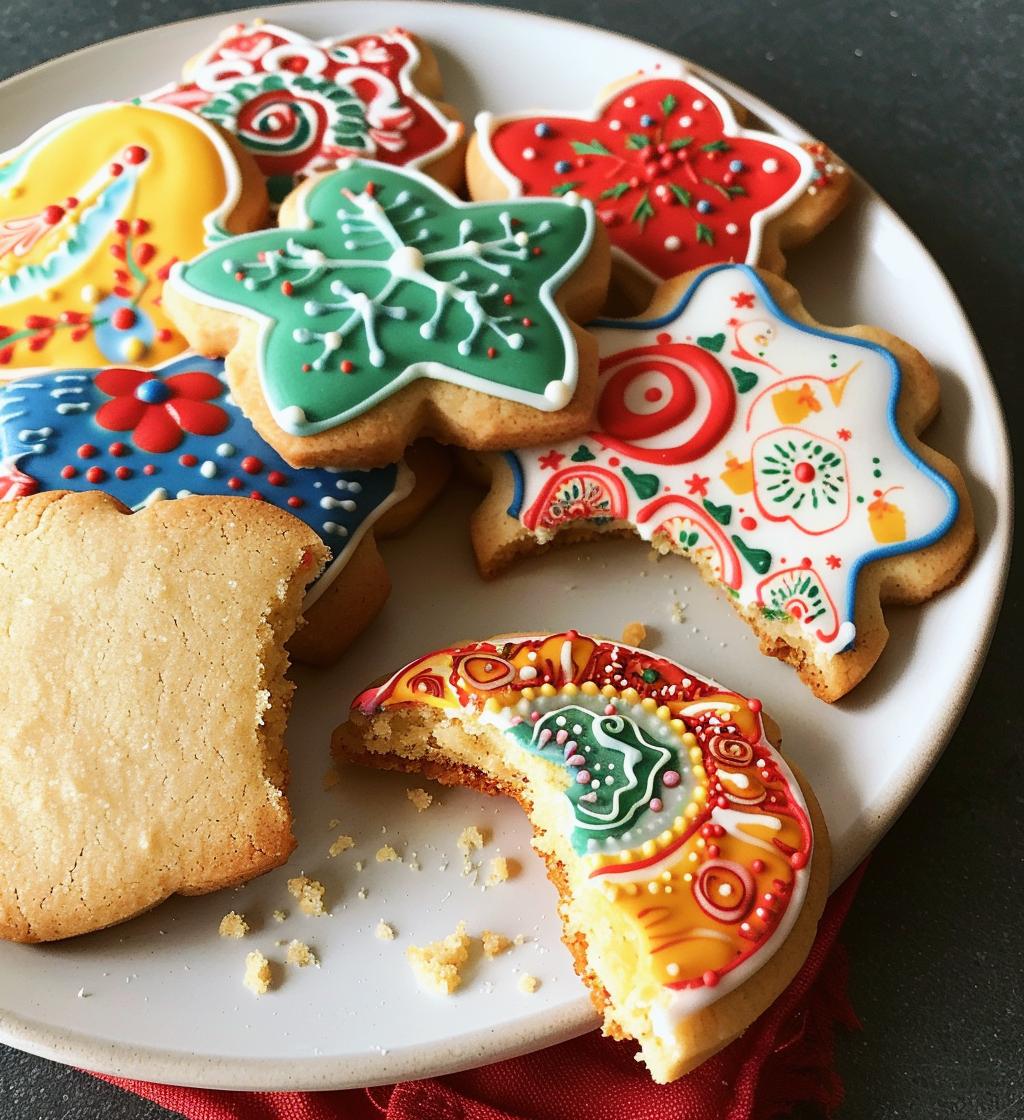
Oh, the joy of Christmas baking! There’s just something magical about the scent of cookies wafting through the house, isn’t there? When December rolls around, I can’t resist pulling out my favorite baking supplies and transforming my kitchen into a festive wonderland. I love creating a Christmas baking aesthetic—you know, those beautifully decorated cookies that are almost too pretty to eat? My fondest memories are of gathering with family, rolling out dough, and getting flour everywhere while trying to make the perfect shapes with festive cookie cutters. It’s a delightful mess, but trust me, the laughter and cheer make it all worthwhile! Plus, decorating each cookie feels like putting a little piece of my heart into every bite. So, let’s dive into this delicious adventure together and make some holiday magic happen!
Ingredients List
- 2 cups all-purpose flour
- 1 cup granulated sugar
- 1/2 cup unsalted butter, softened
- 1 large egg
- 1 tsp vanilla extract
- 1 tsp baking powder
- 1/2 tsp salt
- 2 cups powdered sugar (for icing)
- 2 tbsp milk (for icing)
- Food coloring (for decorating)
How to Prepare Instructions
- First things first, preheat your oven to 350°F (175°C). This ensures our cookies will bake evenly and come out perfectly golden.
- In a large mixing bowl, cream together the softened butter and granulated sugar until it’s light and fluffy. This usually takes about 2-3 minutes, and trust me, the fluffier the better!
- Next, beat in the egg and vanilla extract. Mix well until everything is combined beautifully. You’ll want to get that sweet vanilla aroma wafting through your kitchen!
- In another bowl, whisk together the all-purpose flour, baking powder, and salt. This helps distribute the baking powder evenly, ensuring our cookies rise just right.
- Gradually add the dry mixture to the wet ingredients, mixing just until everything is combined. Don’t overmix, or we’ll end up with tough cookies, and we definitely don’t want that!
- Now for the fun part! Roll the dough into small balls—about 1 inch in size—and place them on a baking sheet lined with parchment paper. Give them some space because they’ll spread a bit as they bake.
- Pop them in the oven and bake for 10-12 minutes, or until they are lightly golden around the edges. Keep an eye on them; every oven is a bit different!
- Once they’re out, let the cookies cool completely on a wire rack. I know it’s hard to resist, but patience is key here—they’ll be even better once we ice them!
- While the cookies are cooling, mix up the powdered sugar and milk in a bowl to make your icing. It should be smooth and spreadable. If you want it thicker, add more sugar; for a thinner consistency, just a splash more milk will do.
- Finally, get creative! Decorate your cooled cookies with the icing and add food coloring for that festive touch. Go wild—this is your masterpiece!
Why You’ll Love This Recipe
- Quick and easy to whip up, making it perfect for last-minute holiday baking.
- Creates a beautiful Christmas baking aesthetic that’s sure to impress your family and friends.
- Customizable decorations let you unleash your creativity—no two cookies need to look the same!
- Perfect for making memories with loved ones as you bake and decorate together.
- Deliciously soft and sweet, these cookies are a delightful treat for any festive gathering.
Tips for Success
To truly elevate your Christmas cookie game, here are some tips I swear by. First, make sure your butter is softened, but not melted—this is key for that perfect texture. If you forget to take it out ahead of time, just pop it in the microwave for 10 seconds, checking frequently so it doesn’t melt! Next, don’t skip the chilling step; if your dough feels too sticky, refrigerate it for 30 minutes. This makes rolling so much easier and helps the cookies hold their shape while baking.
Also, when decorating, let your icing set for a bit before stacking your cookies—nobody wants a gooey mess, right? And finally, experiment with different colors and designs! I love adding sprinkles or edible glitter for that extra festive flair. Trust me, your cookies will not only taste amazing, but they’ll look stunning too!
Variations
One of the best parts about these cookies is how versatile they are! You can easily switch up the flavors by adding different extracts—like almond or peppermint—for a unique twist. Feeling adventurous? Try incorporating some cocoa powder into the dough for chocolate cookies or mix in festive spices like cinnamon or nutmeg for that warm holiday vibe.
For decorations, think outside the box! Use crushed candy canes, coconut flakes, or even edible glitter to bring your cookies to life. If you need a gluten-free option, just substitute the all-purpose flour with a gluten-free blend. Get creative with your designs; the sky’s the limit on how you can make these cookies your own!
Storage & Reheating Instructions
To keep your delightful cookies fresh, store them in an airtight container at room temperature. They’ll stay tasty for about a week—if they last that long! If you want to keep them longer, you can freeze them. Just ensure they’re cooled completely, then layer them between sheets of parchment paper in a freezer-safe container. They’ll be good for up to three months!
If you’re craving a warm cookie later, just pop them in the microwave for about 10-15 seconds. It’s like bringing a little bit of that fresh-baked magic back!
Nutritional Information Section
Each cookie is a delightful balance of sweetness and indulgence. Here’s the estimated nutritional breakdown per cookie:
- Calories: 150
- Fat: 5g
- Saturated Fat: 3g
- Trans Fat: 0g
- Cholesterol: 15mg
- Sodium: 50mg
- Carbohydrates: 22g
- Fiber: 0g
- Sugar: 10g
- Protein: 1g
Keep in mind, these values are estimates, but they give you a good idea of the joy you’re indulging in with each delicious bite. Enjoy the festive flavors guilt-free, and remember, it’s all about balance during the holidays!
FAQ Section
Can I use margarine instead of butter? Absolutely! Margarine can be a great alternative, just ensure it’s softened to the same consistency as butter for the best results. Your cookies will still come out delicious!
How can I achieve a thicker icing? If you want that icing to really hold its shape, simply add more powdered sugar until you reach your desired thickness. It’s all about finding that perfect balance for your decorating needs!
What’s the best way to decorate my cookies? Get creative! You can use piping bags for intricate designs or simply spread icing with a knife for a more rustic look. Add sprinkles, edible glitter, or even mini chocolate chips for fun textures!
Can I make the dough ahead of time? Yes! You can prepare the dough and refrigerate it for up to 3 days before baking. Just let it sit at room temperature for a few minutes before rolling it out.
What if my cookies spread too much while baking? This can happen if the dough is too warm or if it’s overmixed. Make sure to chill the dough if it feels sticky and avoid overmixing once the flour is added. Keeping an eye on baking time helps too!
Print
Christmas Baking Aesthetic: 5 Tips for Perfect Cookies
- Prep Time: 20 minutes
- Cook Time: 12 minutes
- Total Time: 32 minutes
- Yield: 24 cookies 1x
- Category: Dessert
- Method: Baking
- Cuisine: American
- Diet: Vegetarian
Description
A festive guide to creating a beautiful Christmas baking aesthetic.
Ingredients
- 2 cups all-purpose flour
- 1 cup sugar
- 1/2 cup butter, softened
- 1 large egg
- 1 tsp vanilla extract
- 1 tsp baking powder
- 1/2 tsp salt
- 2 cups powdered sugar (for icing)
- 2 tbsp milk (for icing)
- Food coloring (for decorating)
Instructions
- Preheat the oven to 350°F (175°C).
- In a bowl, cream together butter and sugar.
- Add the egg and vanilla; mix well.
- In another bowl, combine flour, baking powder, and salt.
- Gradually add dry ingredients to the wet mixture.
- Roll dough into balls and place on a baking sheet.
- Bake for 10-12 minutes or until lightly golden.
- Let cookies cool completely.
- Mix powdered sugar and milk to make icing.
- Decorate cookies with icing and food coloring.
Notes
- Use festive cookie cutters for unique shapes.
- Allow icing to harden before stacking cookies.
- Store cookies in an airtight container.
Nutrition
- Serving Size: 1 cookie
- Calories: 150
- Sugar: 10g
- Sodium: 50mg
- Fat: 5g
- Saturated Fat: 3g
- Unsaturated Fat: 2g
- Trans Fat: 0g
- Carbohydrates: 22g
- Fiber: 0g
- Protein: 1g
- Cholesterol: 15mg
Keywords: christmas baking, holiday cookies, festive treats