
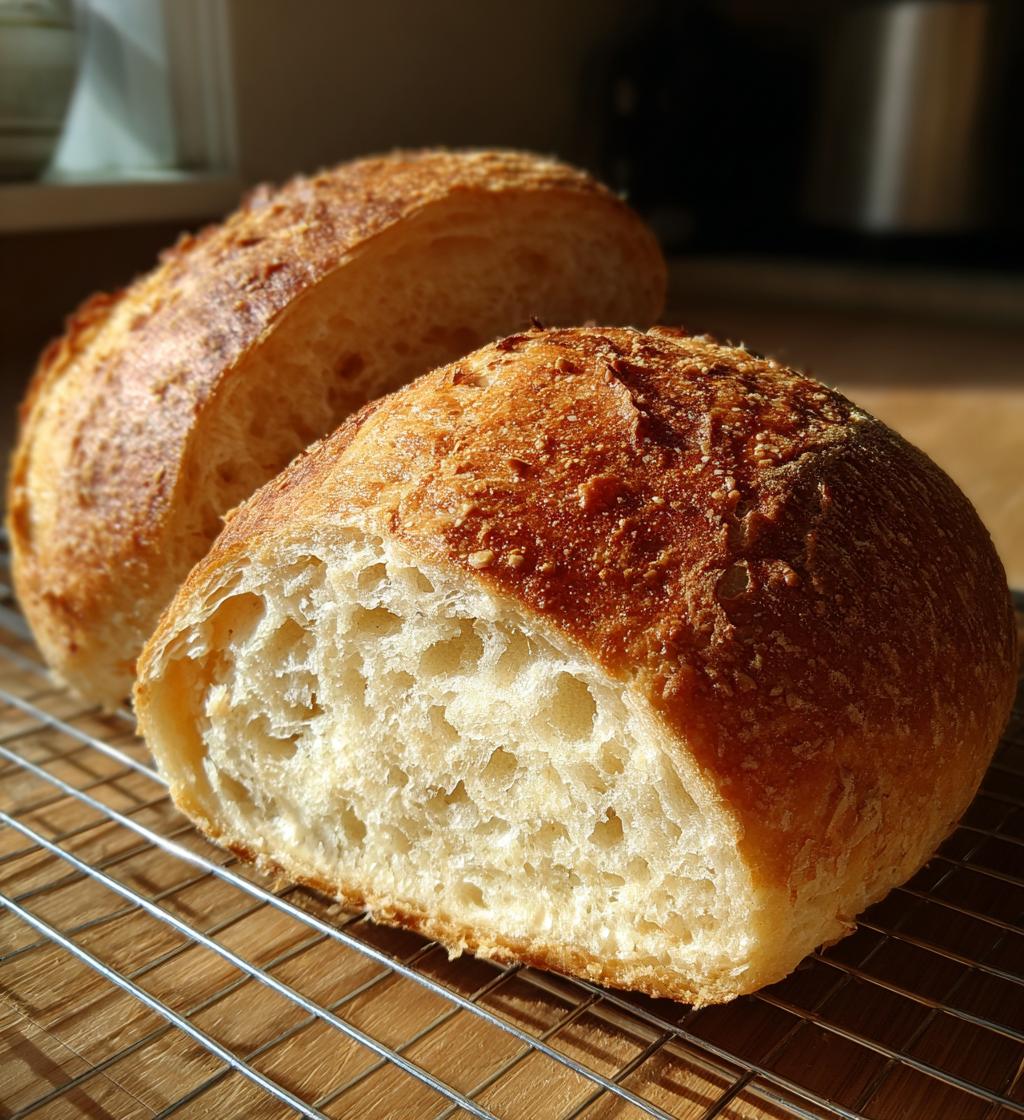
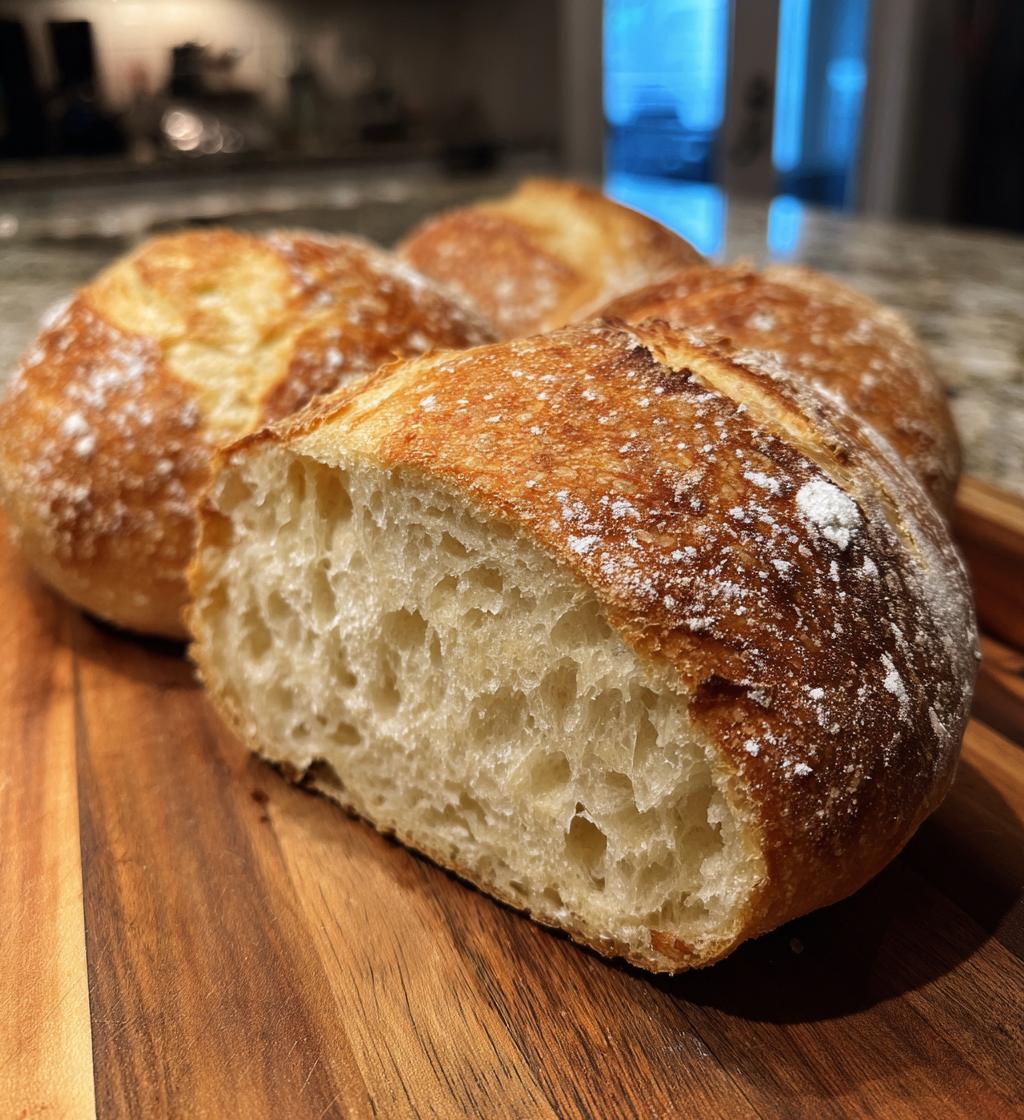
Oh my goodness, let me tell you about the joy of making crusty chewy French bread rolls! There’s something magical about the smell of freshly baked bread wafting through the house. I remember the first time I made these rolls; I was a bit nervous, but the moment I pulled them out of the oven and saw that beautiful golden crust, my heart did a little happy dance! These rolls are so versatile—perfect for mopping up soup, serving alongside a hearty dinner, or just slathering with butter while still warm. Trust me, the crispy exterior and soft, chewy interior are a match made in heaven. Plus, they’re surprisingly easy to whip up, and once you get the hang of it, you’ll find yourself baking them on repeat. You’re going to love every bite!
Ingredients List
- 4 cups all-purpose flour, sifted
- 2 teaspoons salt
- 1 teaspoon sugar
- 1 packet (2 1/4 teaspoons) active dry yeast
- 1 1/2 cups warm water (about 110°F or 43°C)
How to Prepare Instructions
Step 1: Activate Yeast
First things first, let’s wake up that yeast! In a bowl, combine the warm water (aim for about 110°F or 43°C), sugar, and the packet of active dry yeast. Give it a gentle stir and let it sit for about 10 minutes. You’ll want to see it start to froth and bubble a bit—that’s a good sign your yeast is alive and ready to do its magic!
Step 2: Combine Ingredients
Once your yeast is nice and bubbly, it’s time to bring in the flour and salt. Add the sifted all-purpose flour and salt to the yeast mixture. I usually grab a wooden spoon and mix until it all comes together into a shaggy dough. Don’t worry if it looks a bit messy at first; that’s totally normal!
Step 3: Knead the Dough
Now comes the fun part—kneading! Lightly flour your work surface, and dump the dough out. Knead it for about 10 minutes. You’ll want to push, fold, and turn the dough until it’s smooth and elastic. If it feels too sticky, sprinkle a little more flour, but be careful not to overdo it! The dough should be slightly tacky but not sticking to your fingers.
Step 4: First Rise
Once you’ve kneaded your dough to a beautiful smoothness, place it in a greased bowl and cover it with a clean kitchen towel. Now, let it rise in a warm spot for about 1 hour. You’ll know it’s ready when it’s doubled in size, and if you gently poke it with your finger, the dough should spring back just a bit. It’s like watching your dough grow up!
Step 5: Preheat Oven
While your dough is rising, go ahead and preheat your oven to 450°F (230°C). Trust me, this step is crucial for achieving that perfect crust. You want the oven to be hot and ready to create that magical crusty outside while keeping the inside soft and chewy.
Step 6: Shape Rolls
Once your dough has risen, it’s time to punch it down to release the air—don’t be shy! Then, turn it out onto your lightly floured surface. Divide the dough into 12 equal pieces and shape each piece into a roll. I like to tuck the edges underneath to make them nice and round. Just make sure they’re uniform in size so they bake evenly!
Step 7: Second Rise
Now, place your shaped rolls on a baking sheet lined with parchment paper. Leave some space between each roll because they’ll puff up again during this second rise. Cover them with your kitchen towel and let them rise for another 30 minutes. You’ll notice they’ll get plump and cozy!
Step 8: Prepare for Baking
Before popping those rolls in the oven, let’s give them a little flair! Use a sharp knife to make a couple of slashes on top of each roll. This not only looks beautiful but also lets the steam escape while they bake, helping to create that crust we all love.
Step 9: Baking
It’s time for the grand finale! Place your rolls in the preheated oven and bake for about 20-25 minutes. They should turn a gorgeous golden brown color. To check for doneness, tap the bottom of a roll; it should sound hollow. Once they’re baked to perfection, take them out and let them cool slightly before digging in. Wow, the smell alone will have everyone racing to the kitchen!
Why You’ll Love This Recipe
- Quick preparation—you’re just about an hour and a half away from fresh-baked rolls!
- Easy to make; even if you’re a beginner, you’ll feel like a pro in no time.
- Perfect for any meal—serve them with dinner, brunch, or just slather with butter for a snack.
- Great for freezing; make a big batch and have them on hand for whenever the craving strikes!
- Customizable! Add herbs, cheese, or spices to the dough for a personal twist.
- They make your kitchen smell like a French bakery—who doesn’t want that?
- Impressive enough to serve to guests, yet simple enough for a weeknight dinner.
Tips for Success
Alright, my fellow bread bakers, let’s make sure you nail these crusty chewy French bread rolls! Here are some of my favorite tips to help you on your baking journey:
- Temperature is key: Make sure your water is just the right temperature for activating the yeast—around 110°F (43°C) is perfect! If it’s too hot, it can kill the yeast, and if it’s too cold, it won’t activate properly.
- Don’t rush the rise: Give your dough plenty of time to rise. If your kitchen is chilly, try placing it in a slightly warm oven (turned off) or near a sunny window to encourage it.
- Flour your surface wisely: When kneading, sprinkle just enough flour to keep the dough from sticking to your hands and the surface. Too much flour can make your rolls dense instead of light and airy.
- Enhance the flavor: Feel free to add fresh herbs, minced garlic, or even a bit of grated cheese into the dough for an extra punch of flavor. It’s a great way to personalize your rolls!
- Steam for the win: For an even crustier exterior, place a shallow pan of water on the bottom rack of the oven while the rolls bake. The steam helps create that amazing crust we all love!
- Let them cool: Once baked, let your rolls cool on a wire rack. This prevents the bottoms from getting soggy and keeps that crust nice and crisp.
With these tips in your back pocket, you’ll be on your way to baking the best crusty chewy French bread rolls ever. Enjoy every delicious bite!
Storage & Reheating Instructions
Alright, let’s talk about keeping those delicious crusty chewy French bread rolls fresh for as long as possible! Once they’ve cooled completely, I recommend storing them in a paper bag or wrapped in a clean kitchen towel. This way, they can breathe a little and won’t get too soggy. Just keep them at room temperature, and they should stay tasty for about 2-3 days. If you want to keep them longer, pop them in the freezer!
To freeze, wrap each roll tightly in plastic wrap and then place them in a freezer-safe bag. They’ll be good for up to 2 months—perfect for those moments when you crave fresh bread! When you’re ready to enjoy them, just take out however many you need and let them thaw at room temperature. If you want to bring back that warm, crusty texture, preheat your oven to 350°F (175°C) and bake them for about 10-15 minutes. Oh, the smell will be heavenly, and you’ll feel like you just baked them fresh again!
Just remember, while they’re best enjoyed warm, you can also slice them and toast them for breakfast or a quick snack. However you choose to enjoy your rolls, they’re sure to bring a smile to your face!
Nutritional Information
Now, let’s talk about the nutritional side of these delightful crusty chewy French bread rolls! While they’re undoubtedly delicious, it’s always good to know what you’re indulging in. Here’s a breakdown of the estimated nutritional values per roll:
- Calories: 150
- Fat: 1g
- Saturated Fat: 0g
- Unsaturated Fat: 0g
- Trans Fat: 0g
- Cholesterol: 0mg
- Sodium: 300mg
- Carbohydrates: 31g
- Fiber: 1g
- Protein: 4g
- Sugar: 0g
Remember, these values are estimates and can vary based on the specific ingredients you use. But hey, enjoying a fresh-baked roll still feels like a win to me! So, whether you’re pairing them with a hearty soup or enjoying them on their own, you can savor every bite with a little knowledge of what’s inside!
FAQ Section
Can I use whole wheat flour?
Absolutely! You can substitute whole wheat flour for part of the all-purpose flour. I recommend starting with about half and see how you like the texture. Whole wheat flour will give your rolls a nuttier flavor and a bit more density, but they’ll still be delicious!
What if my dough doesn’t rise?
Oh no! If your dough isn’t rising, it might be due to the yeast not being activated properly or the environment being too cold. Double-check that your water is warm enough (around 110°F or 43°C) and try placing the dough in a warmer spot. If it still doesn’t rise after an hour, it might be worth starting over with fresh yeast.
How can I make these rolls softer?
To achieve softer rolls, you might want to add a tablespoon of softened butter or olive oil to the dough during mixing. This little addition helps create a tender texture. Also, be sure not to overbake them; taking them out when they’re golden brown ensures they stay soft inside!
Can I make the dough ahead of time?
Yes, you can! If you want to prepare the dough in advance, you can let it rise, then punch it down and refrigerate it. Just make sure to let it come back to room temperature and rise again before shaping and baking. It’s a great way to have fresh rolls with less last-minute stress!
What can I do with leftover rolls?
If you have any rolls left over, they make fantastic croutons for salads! Just cube them, toss with a bit of olive oil, garlic, and your favorite herbs, then bake until crispy. Or, slice them for sandwiches—trust me, crusty chewy French bread rolls make for a heavenly sandwich base!
Crusty Chewy French Bread Rolls: 8 Tips for Perfection
- Prep Time: 10 minutes
- Cook Time: 25 minutes
- Total Time: 1 hour 35 minutes
- Yield: 12 rolls 1x
- Category: Bread
- Method: Baking
- Cuisine: French
- Diet: Vegetarian
Description
Delicious crusty chewy French bread rolls perfect for any meal.
Ingredients
- 4 cups all-purpose flour
- 2 teaspoons salt
- 1 teaspoon sugar
- 1 packet active dry yeast
- 1 1/2 cups warm water
Instructions
- In a bowl, mix warm water, sugar, and yeast. Let it sit for 10 minutes.
- Add flour and salt. Mix until a dough forms.
- Knead the dough for 10 minutes until smooth.
- Let the dough rise in a warm place for 1 hour.
- Preheat the oven to 450°F (230°C).
- Punch down the dough and shape it into rolls.
- Place rolls on a baking sheet and let them rise for 30 minutes.
- Make slashes on top of each roll.
- Bake for 20-25 minutes until golden brown.
Notes
- Store rolls in a paper bag for freshness.
- Best served warm.
- Can be frozen for later use.
Nutrition
- Serving Size: 1 roll
- Calories: 150
- Sugar: 0g
- Sodium: 300mg
- Fat: 1g
- Saturated Fat: 0g
- Unsaturated Fat: 0g
- Trans Fat: 0g
- Carbohydrates: 31g
- Fiber: 1g
- Protein: 4g
- Cholesterol: 0mg
Keywords: crusty chewy french bread rolls