
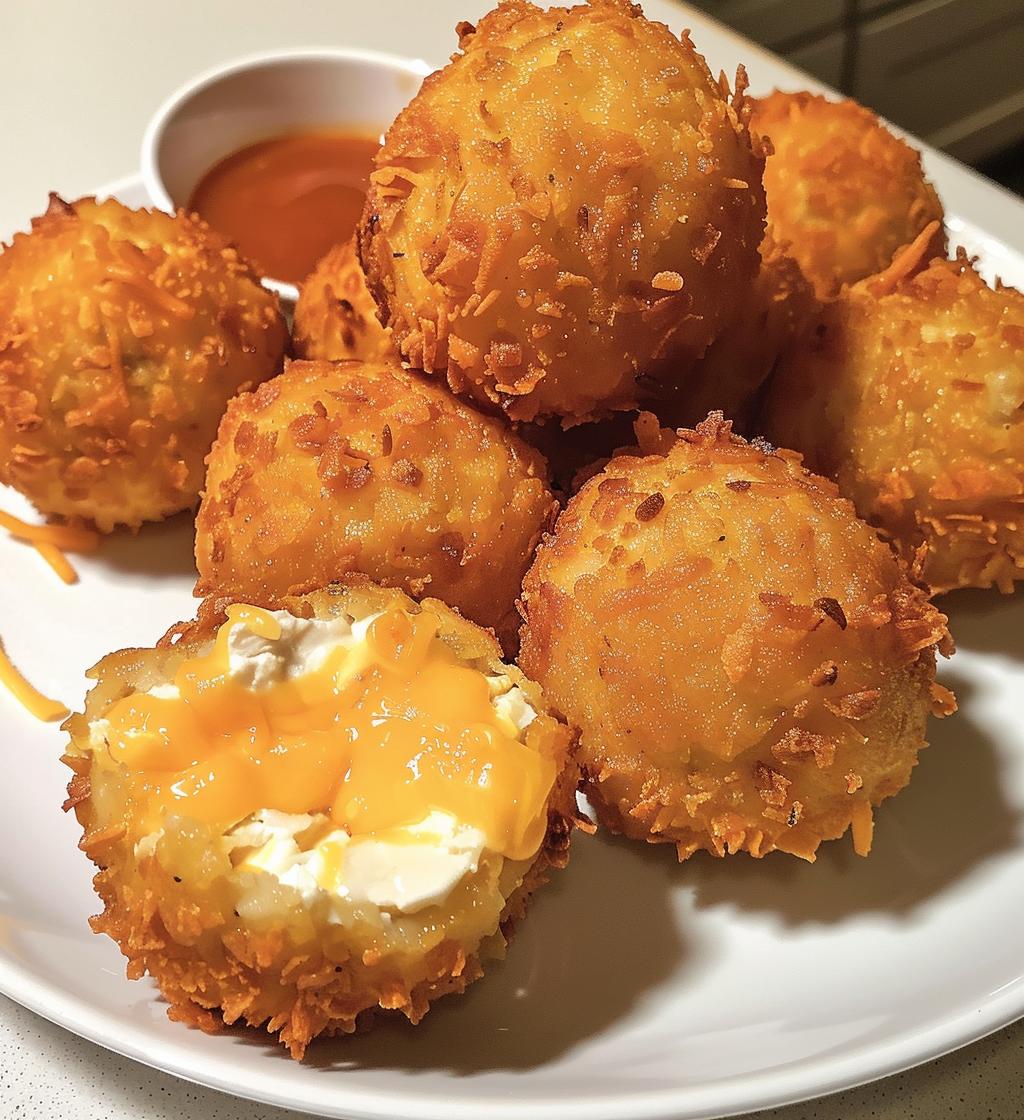
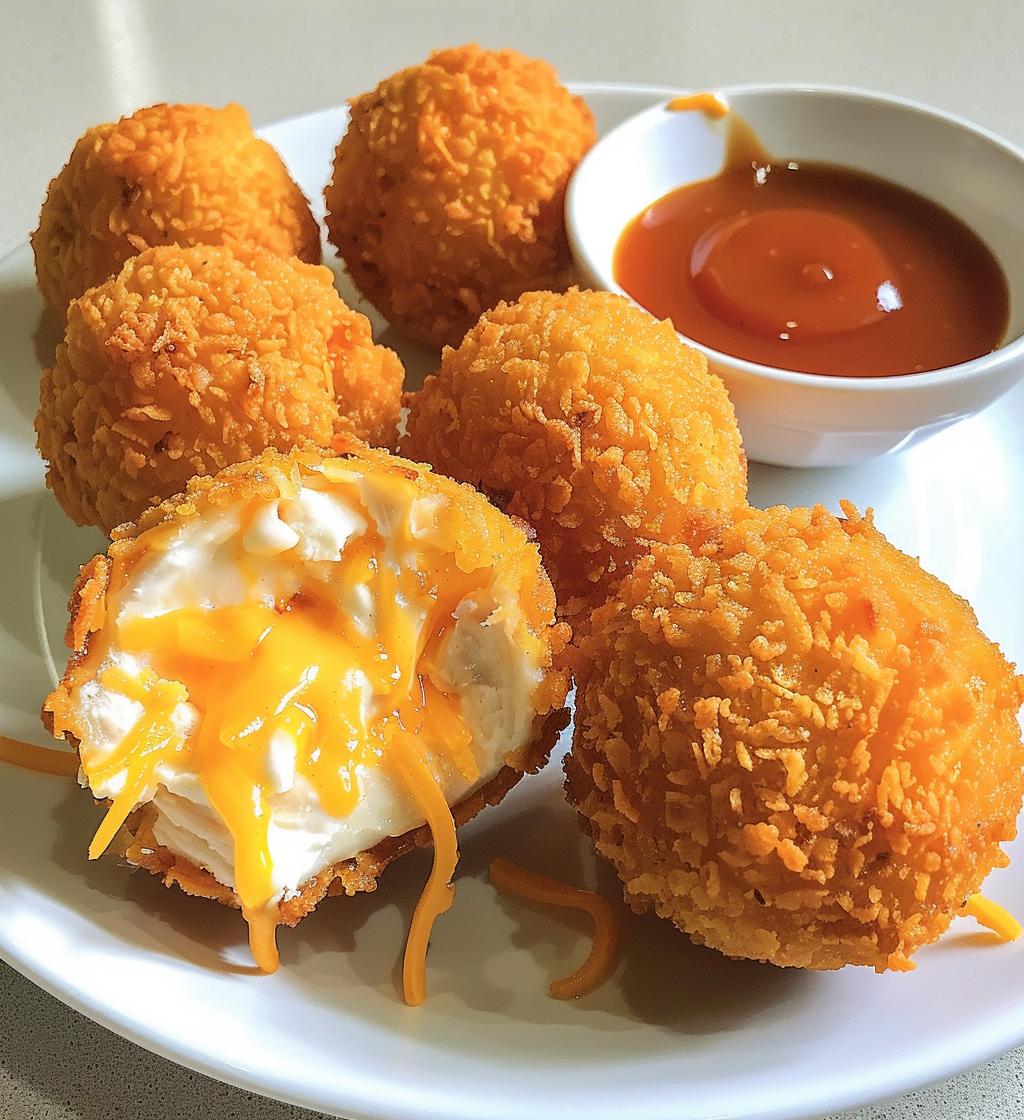
Let me tell you, Crispy Chicken Cheese Balls are pure magic! Imagine tender, juicy chicken combined with gooey melted cheese, all wrapped in a crunchy golden crust. They’re the ultimate snack that always disappears at gatherings. I remember the first time I made these for a game night with friends; the room filled with that irresistible aroma, and before I knew it, they were gone in a flash! People just can’t resist popping one after another. Whether you’re hosting a party or just need a tasty treat for movie night, these little bites are guaranteed to impress. Trust me, once you try them, you’ll want to make them again and again! They’re so versatile, too, which makes them a go-to in my kitchen. Ready to get started? Let’s dive into the deliciousness!
Ingredients List
- 1 cup cooked chicken, shredded
- 1/2 cup cream cheese, softened
- 1/2 cup shredded cheddar cheese
- 1/2 cup breadcrumbs
- 1/4 cup grated Parmesan cheese
- 1 egg, beaten
- 1 tsp garlic powder
- 1 tsp onion powder
- Salt and pepper to taste
- Oil for frying
How to Prepare Crispy Chicken Cheese Balls
Making Crispy Chicken Cheese Balls is a breeze! Let’s break it down so you can dive into this deliciousness without any stress.
Step 1: Mix the Ingredients
First things first, grab a large mixing bowl and toss in the shredded chicken, cream cheese, shredded cheddar, garlic powder, onion powder, salt, and pepper. Now, get your hands in there (or use a spatula if you prefer!) and mix everything until it’s well combined. You want that cheesy goodness to be evenly distributed throughout the chicken. It should come together nicely and be easy to handle.
Step 2: Form the Balls
Next, it’s time to form the mixture into small balls. I like to aim for about 1 to 1.5 inches in diameter—just the right size for popping in your mouth! Make sure your hands are slightly damp to prevent sticking, and gently roll the mixture into balls. Don’t worry if they’re not perfect; a little character adds charm!
Step 3: Coat the Balls
Now, let’s coat these beauties. Take each ball and dip it into the beaten egg, letting the excess drip off. Then, roll it in the breadcrumbs, making sure it’s thoroughly covered for that perfect crunch. You want every inch to be coated for that amazing texture when they fry up!
Step 4: Frying
Heat oil in a pan over medium heat. You’ll know it’s ready when a tiny drop of batter sizzles upon contact. Carefully add the balls to the hot oil, making sure not to overcrowd the pan—this helps them cook evenly. Fry them for about 3-4 minutes on each side or until they’re golden brown all over. Once they look perfect, remove them with a slotted spoon and let them drain on paper towels. This will keep them crispy and not greasy! And just like that, you’ve got yourself a plate full of crispy, cheesy goodness!
Why You’ll Love This Recipe
- Quick to prepare—ready in just 25 minutes!
- Perfect for gatherings; they’re always a crowd-pleaser.
- Flavorful and cheesy; every bite is a delightful explosion of taste.
- Customizable with spices, so you can make them just how you like!
- Can be baked for a healthier option if you’re looking to lighten things up.
Tips for Success
Alright, let’s chat about how to make sure your Crispy Chicken Cheese Balls turn out perfectly every single time! I’ve learned a few tricks along the way that I can’t wait to share with you.
- Spice it up: Feel free to adjust the spices to match your taste buds. If you love a kick, add some cayenne pepper or a dash of hot sauce to the mixture. It’s all about making these little bites your own!
- Check your oil temperature: Before frying, make sure the oil is hot enough. You can test it by dropping in a small piece of bread or batter; if it sizzles and browns quickly, you’re good to go! If it’s not hot enough, the cheese balls might absorb too much oil and become greasy.
- Don’t overcrowd the pan: Fry in batches if you need to. Giving each ball space to swim around helps them cook evenly and get that gorgeous golden crust without steaming. Trust me, it makes a huge difference!
- Drain properly: Once they’re fried, let your crispy balls drain on paper towels. This step is crucial for keeping them crispy and not oily. Nobody wants a soggy snack, right?
- Experiment: Don’t hesitate to experiment with different cheeses or add-ins, like chopped jalapeños, cooked bacon, or fresh herbs. The possibilities are endless, and you might just stumble upon your new favorite version!
With these tips in your back pocket, you’re all set to whip up the best Crispy Chicken Cheese Balls ever. Enjoy the process and, most importantly, have fun in the kitchen!
Variations
One of the best things about Crispy Chicken Cheese Balls is how versatile they are! You can easily customize the flavors to suit your taste or whatever you have on hand. Here are some fun ideas to switch things up:
- Cheese Lovers: Swap out the cheddar for pepper jack for a spicy twist, or go for a creamier texture with mozzarella. You can even mix different cheeses for a flavor explosion!
- Herb Infusion: Add fresh herbs like chopped parsley, cilantro, or green onions to the mixture for an extra layer of flavor. They’ll give your cheese balls a fresh taste and a pop of color!
- Veggie Boost: Sneak in some finely chopped vegetables like spinach, bell peppers, or zucchini. Just make sure to squeeze out any excess moisture before adding them to the mix to keep the texture just right.
- Buffalo Style: For a spicy kick, mix in some buffalo sauce with the chicken and cheese. Serve with ranch or blue cheese dressing for dipping, and you’ve got a crowd-pleaser with a fiery twist!
- Italian Flair: Incorporate Italian seasoning and some grated Parmesan into the mix. You can even serve them with marinara sauce for dipping—delicious!
- Sweet & Savory: Try adding a touch of sweetness with some finely chopped cooked bacon or ham, and a dollop of barbecue sauce mixed in for a fun flavor contrast.
Feel free to get creative and experiment with different combinations. The joy of cooking is in making it your own, so have fun with these variations and discover your favorite flavors!
Nutritional Information Section
Now, let’s talk about the nutritional goodness packed into these delicious Crispy Chicken Cheese Balls! Keep in mind that these values are estimates, but they give you a good idea of what you’re enjoying with every crispy bite. Here’s a breakdown for a serving size of 4 balls:
- Calories: 250
- Fat: 15g
- Saturated Fat: 6g
- Unsaturated Fat: 7g
- Trans Fat: 0g
- Cholesterol: 60mg
- Sodium: 300mg
- Carbohydrates: 15g
- Fiber: 1g
- Sugar: 1g
- Protein: 15g
These little bites are not only tasty but also pack a protein punch, making them a satisfying snack! Just remember, if you decide to bake them instead of frying, the nutritional values may change a bit. Enjoy indulging in this delightful treat while knowing a bit about what you’re munching on!
FAQ Section
Can I bake these instead of frying?
Absolutely! Baking is a fantastic option if you’re looking to lighten things up. Preheat your oven to 400°F (200°C), place the coated chicken balls on a baking sheet lined with parchment paper, and bake for about 15-20 minutes or until they’re golden brown and crispy. Just keep an eye on them, as baking times can vary!
How do I store leftovers?
If you happen to have any leftovers (which is rare because they’re so delicious!), you can store them in an airtight container in the refrigerator for up to 3 days. When you’re ready to enjoy them again, just pop them in the oven at 350°F (175°C) for about 10 minutes to reheat and regain that crispy texture!
What dipping sauces pair well?
Oh, there are so many delicious options! I love serving these Crispy Chicken Cheese Balls with classic ranch dressing, tangy barbecue sauce, or creamy blue cheese dressing. If you’re feeling adventurous, try a spicy sriracha mayo or a zesty honey mustard. The right dip can really elevate the flavor!
Can I use leftover rotisserie chicken?
Definitely! Using leftover rotisserie chicken is a great way to save time and add wonderful flavor. Just shred the chicken and mix it in as you would with regular cooked chicken. It’s a fantastic shortcut that still delivers on taste!
Serving Suggestions
When it comes to serving Crispy Chicken Cheese Balls, the options are endless, and they make a fantastic appetizer for any occasion! I love to serve these little bites at parties or family gatherings because they’re always a hit. Here are some ideas to elevate your serving game:
- Platter it up: Arrange the cheese balls on a large platter with colorful toothpicks for easy grabbing. Add some fresh herbs like parsley or cilantro for a pop of color!
- Dipping sauce bar: Create a little dipping sauce bar with a variety of sauces. Include ranch, barbecue, honey mustard, and a spicy sriracha mayo. Guests will love mixing and matching!
- Fresh veggies: Serve them alongside a platter of fresh veggies like carrots, celery, and bell peppers. The crunch from the veggies complements the cheesy goodness perfectly!
- Salad pairing: Pair your cheese balls with a light, crisp salad. A simple green salad drizzled with a tangy vinaigrette balances out the richness of the cheese balls beautifully.
- Game day snack: If you’re hosting a game day, serve these cheese balls with nachos and your favorite chili for a hearty spread that everyone will love!
- Mini sliders: For a fun twist, make mini sliders using the cheese balls as the main attraction. Place them in small burger buns with lettuce and your favorite sauce for a delightful bite-sized treat!
These serving suggestions will not only make your table look inviting but will also ensure that your guests are raving about your delicious Crispy Chicken Cheese Balls all night long. Enjoy the compliments and the smiles they bring!
Print
Crispy Chicken Cheese Balls: 5 Magical Bites to Savor
- Prep Time: 15 minutes
- Cook Time: 10 minutes
- Total Time: 25 minutes
- Yield: 4 servings 1x
- Category: Appetizer
- Method: Frying
- Cuisine: American
- Diet: Low Calorie
Description
Crispy Chicken Cheese Balls are delicious snacks made with tender chicken and melted cheese, coated in a crunchy layer.
Ingredients
- 1 cup cooked chicken, shredded
- 1/2 cup cream cheese
- 1/2 cup shredded cheddar cheese
- 1/2 cup breadcrumbs
- 1/4 cup grated Parmesan cheese
- 1 egg, beaten
- 1 tsp garlic powder
- 1 tsp onion powder
- Salt and pepper to taste
- Oil for frying
Instructions
- In a bowl, combine shredded chicken, cream cheese, cheddar cheese, garlic powder, onion powder, salt, and pepper.
- Mix well until combined.
- Form the mixture into small balls.
- Dip each ball in beaten egg, then roll in breadcrumbs.
- Heat oil in a pan over medium heat.
- Fry the balls until golden brown on all sides.
- Remove and drain on paper towels.
Notes
- Adjust spices as per your taste.
- Can be baked instead of fried for a healthier option.
- Serve with your favorite dipping sauce.
Nutrition
- Serving Size: 4 balls
- Calories: 250
- Sugar: 1g
- Sodium: 300mg
- Fat: 15g
- Saturated Fat: 6g
- Unsaturated Fat: 7g
- Trans Fat: 0g
- Carbohydrates: 15g
- Fiber: 1g
- Protein: 15g
- Cholesterol: 60mg
Keywords: Crispy Chicken Cheese Balls