

Oh, let me tell you about my love for granola bars! It all started when I was a busy student, constantly on the go and in need of a quick, healthy snack. I remember rushing out the door, grabbing a store-bought granola bar, and thinking, “There has to be a better way!” So, I set out to create my own version, and let me say, it was a game-changer! These homemade granola bars are not only super easy to whip up, but they’re also packed with nutrition. They’re filled with wholesome oats, nuts, and a touch of sweetness, making them the perfect pick-me-up for busy mornings or afternoon slumps. Plus, I love that I can customize them with my favorite ingredients, whether I’m in the mood for chocolate chips or dried fruit. Trust me, once you try making your own granola bars, you’ll never reach for the store-bought ones again. They’re healthier, tastier, and you can feel good about what you’re eating!
Ingredients for Granola Bar
To make my delicious homemade granola bars, you’ll need just a handful of simple ingredients. Trust me, these will come together so beautifully! Here’s what you’ll need:
- 2 cups rolled oats
- 1 cup honey (or maple syrup for a vegan option)
- 1 cup creamy peanut butter (smooth works best!)
- 1 cup mixed nuts (chopped if they’re large; I love using almonds, walnuts, and pecans)
- 1/2 cup dried fruit (raisins, cranberries, or whatever you fancy!)
- 1/4 cup chocolate chips (because who doesn’t love a little chocolate?)
Feel free to mix and match these ingredients to suit your taste. You can even throw in some seeds or coconut flakes if you’re feeling adventurous. The possibilities are endless!
How to Prepare Granola Bar
Making your own granola bars is a breeze, and I promise you’ll feel so accomplished when they come out of the oven! Let’s get started with these easy steps:
Step-by-Step Instructions
- First things first, preheat your oven to 350°F (175°C). This is super important because we want those bars to bake evenly and get that lovely golden color!
- In a large mixing bowl, combine the rolled oats, honey, and peanut butter. I like to use a spatula to mix everything together until it’s well combined. You want all those oats to be coated nicely!
- Next, add in your chopped mixed nuts, dried fruit, and chocolate chips. Give it another good stir—this is where the fun happens, and the mixture starts to look deliciously chunky!
- Now, take a lined baking dish (I usually use an 8×8 inch one) and spread the mixture evenly into the dish. Make sure to press it down firmly; this helps the bars hold together when they cool.
- Pop the baking dish in the preheated oven and bake for about 20-25 minutes. You’ll know they’re done when they’re golden brown around the edges. The smell in your kitchen will be incredible, I promise!
- Once baked, remove the dish from the oven and let it cool completely. This step is crucial! If you cut them too soon, they might crumble. So, let them chill out for at least 30 minutes before slicing them into bars.
And there you have it! Homemade granola bars that are perfect for snacking anytime of the day. Enjoy the satisfaction of knowing exactly what’s in your snack!
Why You’ll Love This Recipe
There are so many reasons to fall head over heels for these homemade granola bars! Not only do they taste amazing, but they also offer a bunch of benefits that make them a go-to snack in my kitchen. Here’s why you’ll adore making them at home:
- Healthier Ingredients: You control what goes in! No hidden preservatives or artificial flavors here, just wholesome oats, nuts, and natural sweeteners.
- Customizable: Want to swap honey for maple syrup? Go for it! Prefer almonds over walnuts? You got it! You can create the perfect blend to suit your taste buds.
- Easy to Make: Seriously, if I can whip these up in about 35 minutes, you can too! It’s a straightforward process that yields satisfying results.
- Perfect for Any Time: These bars are great for breakfast on the go, a mid-afternoon snack, or even a post-workout treat. They fit into any part of your day!
- Budget-Friendly: Making granola bars at home is way cheaper than buying those pricey store-bought options. Plus, you can make a whole batch for less!
- Eco-Friendly: By making your own, you reduce packaging waste. It’s a small step that helps the planet while you munch on something delicious!
Trust me, once you start making these granola bars yourself, you’ll never look back! They’re not just a snack; they’re a delightful adventure in your kitchen.
Tips for Success
Now that you’re all set to make these delicious granola bars, let me share some of my best tips to ensure they turn out perfectly every single time!
- Don’t Skip the Cooling: I can’t stress this enough! Letting the granola bars cool completely in the baking dish is key to them holding their shape. If you cut them too soon, you’ll end up with a crumbly mess. Patience is a virtue here!
- Experiment with Ingredients: Feel free to get creative! If you’re not a fan of peanut butter, almond butter works just as well. You can also switch out the mixed nuts for seeds like sunflower or pumpkin seeds for a nut-free version. The world is your oyster!
- Use a Parchment Liner: Lining your baking dish with parchment paper not only makes cleanup a breeze but also ensures the bars come out easily without sticking. Trust me, it’s a game-changer!
- Adjust Sweetness to Your Taste: If you prefer a less sweet granola bar, feel free to reduce the amount of honey or maple syrup. You can always add a little more dried fruit for natural sweetness without overdoing it!
- Watch the Baking Time: Every oven is different, so keep an eye on your bars as they bake. You want them to be golden brown but not burnt. If they start browning too quickly, cover them with foil for the last few minutes.
- Store Properly: Keep your granola bars in an airtight container at room temperature for up to a week. You can also freeze them for longer storage—just wrap them individually for a quick grab-and-go snack!
These tips will help you create the best granola bars ever! Don’t be afraid to make them your own, and enjoy the process as you whip up these tasty treats!
Nutritional Information for Granola Bar
Now, let’s talk about the nutritional goodness packed into these homemade granola bars! Each bar is a delightful combination of wholesome ingredients that not only satisfy your cravings but also fuel your body. Here’s the estimated nutritional breakdown per serving:
- Calories: 200
- Fat: 10g
- Saturated Fat: 2g
- Unsaturated Fat: 8g
- Trans Fat: 0g
- Cholesterol: 0mg
- Sodium: 50mg
- Carbohydrates: 25g
- Fiber: 3g
- Sugar: 10g
- Protein: 5g
These values are estimates and can vary based on the specific ingredients you choose, but they give you a great idea of what you’re munching on. With a good balance of healthy fats, protein, and fiber, these granola bars are a smart snack option that will keep you energized throughout your day. Enjoy every bite without the guilt!
Serving Suggestions
Pairing your homemade granola bars with the right accompaniments can take your snacking experience to a whole new level! Here are some delightful ideas to enhance your snack time:
- Yogurt Parfait: Layer your granola bars with creamy yogurt and fresh fruit for a satisfying parfait. The combination of textures is just divine!
- Nut Butter Dip: Serve a side of almond or peanut butter for dipping. It adds an extra protein punch and is so delicious!
- Fresh Fruit: Enjoy your granola bars alongside some fresh fruit like apple slices, bananas, or berries. The natural sweetness and juiciness complement the chewy texture of the bars perfectly!
- Cheese Plate: For a savory twist, pair your granola bars with a selection of cheeses. A sharp cheddar or creamy brie balances the sweetness beautifully.
- Milk or Plant-Based Milk: A nice glass of milk, whether dairy or almond, makes for a classic combo. It’s a great way to wash down the bars and adds a bit of extra nutrition!
- Trail Mix: Create a mini trail mix by combining your granola bars with nuts, seeds, and dried fruits. It’s a fun way to munch on a variety of flavors and textures!
These serving suggestions not only make your granola bars even more enjoyable but also help create a balanced snack or light meal. Get creative, and find what pairs best with your granola bars to keep your taste buds happy!
Storage & Reheating Instructions
Storing your homemade granola bars properly is key to keeping them fresh and delicious for days! Here’s how I like to do it:
- Room Temperature: After your granola bars have cooled completely, you can store them in an airtight container at room temperature. They’ll stay fresh for about a week. Just make sure the container is sealed tight to prevent any moisture from getting in!
- Refrigeration: If you want them to last a bit longer, you can keep them in the fridge. They’ll be good for up to two weeks this way. Plus, they make a refreshing snack straight from the fridge!
- Freezing: For even longer storage, you can freeze your granola bars. Individually wrap each bar in plastic wrap or foil, then place them in a freezer-safe bag or container. They’ll keep well for up to two months. When you’re ready to enjoy one, simply take it out and let it thaw at room temperature or pop it in the microwave for a few seconds to warm it up.
Trust me, these methods will help maintain their chewy texture and yummy flavor, so you can enjoy them anytime you need a quick snack! Just remember, no need to reheat unless you want to enjoy them warm and melty—either way, they’re delicious!
FAQ Section
Got questions about homemade granola bars? I’ve got you covered! Here are some of the most common inquiries I hear, along with my favorite answers:
How long do homemade granola bars last?
If stored properly in an airtight container, these granola bars can last up to a week at room temperature. If you refrigerate them, they’ll stay fresh for about two weeks. And if you decide to freeze them, they can last up to two months! Just make sure to wrap them individually for the best results.
Can I customize the ingredients?
Absolutely! That’s one of the best parts of making your own granola bars. You can swap out the peanut butter for almond butter, use different kinds of nuts or seeds, and even change up the dried fruit or chocolate chips. The sky’s the limit! Experiment until you find your perfect blend.
Are these granola bars suitable for kids?
Yes! These homemade granola bars make a fantastic snack for kids. They’re packed with healthy ingredients and are way better than most store-bought options filled with added sugars and preservatives. Plus, they can help kids get involved in the kitchen, which is always fun!
Can I make these granola bars vegan?
Definitely! Just substitute honey with maple syrup or agave nectar. Also, ensure that your chocolate chips are dairy-free if you want to keep it completely vegan. It’s super easy to make these bars fit your dietary needs!
What should I do if my granola bars are too crumbly?
If your bars crumble when you cut them, it might be due to not pressing the mixture down firmly enough before baking or cutting them too soon. Make sure to really pack the mixture into the dish, and let them cool completely before slicing. If they still crumble, you can always enjoy them as a granola topping on yogurt or ice cream!
Can I add protein powder to the recipe?
You can! Just keep in mind that adding protein powder might change the texture a bit, so you may need to adjust the amount of wet ingredients. Start with a small amount and see how it goes! It’s a great way to boost the protein content if you’re looking for an extra kick.
Hope these FAQs help you feel more confident in making your own granola bars! If you have any other questions, feel free to reach out. Happy snacking!
Print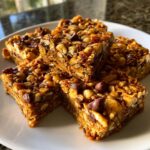
7 Comforting Granola Bar Recipes You’ll Cherish Forever
- Prep Time: 10 minutes
- Cook Time: 25 minutes
- Total Time: 35 minutes
- Yield: 12 bars 1x
- Category: Snack
- Method: Baking
- Cuisine: American
- Diet: Vegetarian
Description
A healthy and tasty granola bar perfect for snacks.
Ingredients
- 2 cups rolled oats
- 1 cup honey
- 1 cup peanut butter
- 1 cup mixed nuts
- 1/2 cup dried fruit
- 1/4 cup chocolate chips
Instructions
- Preheat the oven to 350°F (175°C).
- In a large bowl, mix oats, honey, and peanut butter.
- Add mixed nuts, dried fruit, and chocolate chips.
- Spread the mixture into a lined baking dish.
- Bake for 20-25 minutes until golden.
- Cool completely before cutting into bars.
Notes
- Store bars in an airtight container.
- Can substitute honey with maple syrup for a vegan option.
- Add your favorite nuts or seeds for variety.
Nutrition
- Serving Size: 1 bar
- Calories: 200
- Sugar: 10g
- Sodium: 50mg
- Fat: 10g
- Saturated Fat: 2g
- Unsaturated Fat: 8g
- Trans Fat: 0g
- Carbohydrates: 25g
- Fiber: 3g
- Protein: 5g
- Cholesterol: 0mg
Keywords: granola bar, healthy snack, homemade granola